Understanding the enemy of crispiness is the first step. Moisture is the primary culprit. Seafood, by its very nature, contains a significant amount of water. When this water escapes during the cooking process and mixes with the coating, it breaks down the crisp structure, leading to a limp and unappetizing result. Therefore, any successful frying technique must prioritize minimizing and managing this internal moisture.
The foundation of great fried seafood lies in the selection and preparation of the seafood itself. Freshness is paramount. Opt for the freshest possible ingredients. For shrimp, peel and devein them thoroughly, but consider leaving the tail on for a visually appealing presentation and a convenient handle. For fish, choose fillets that are firm and have a clean, oceanic smell. Scallops should be dry to the touch; if they are wet, pat them thoroughly dry with paper towels.
Proper drying of the seafood before coating is a non-negotiable step. Use a generous amount of paper towels to pat each piece of seafood completely dry. This step removes surface moisture, which is crucial for allowing the coating to adhere properly and for achieving maximum crispiness. Don’t rush this; a few extra minutes here can make a world of difference.
When it comes to the coating, there are several options, each offering a unique texture and flavor profile. The classic choice is often all-purpose flour, seasoned generously with salt, pepper, and other desired spices. However, for superior crispiness and longevity, a combination of ingredients often yields the best results. Think about incorporating cornstarch or rice flour into your flour mixture. These starches have a lower gluten content and absorb less moisture, contributing to a lighter, crispier, and more stable coating.
A popular and highly effective coating involves a three-step process: dredging in seasoned flour, dipping in an egg wash (or a buttermilk/milk mixture), and finally coating in breadcrumbs or a panko mixture. This multi-layered approach creates a robust barrier that holds its shape and crispness.
The role of the egg wash (or alternative binder) is to provide a sticky surface for the final coating to adhere to. Beating eggs with a splash of milk or water creates a smooth, emulsified mixture. Some chefs prefer to use buttermilk for its slight tang and tenderizing effect on the seafood. Ensure the seafood is fully coated in the egg wash before moving to the final dredging.
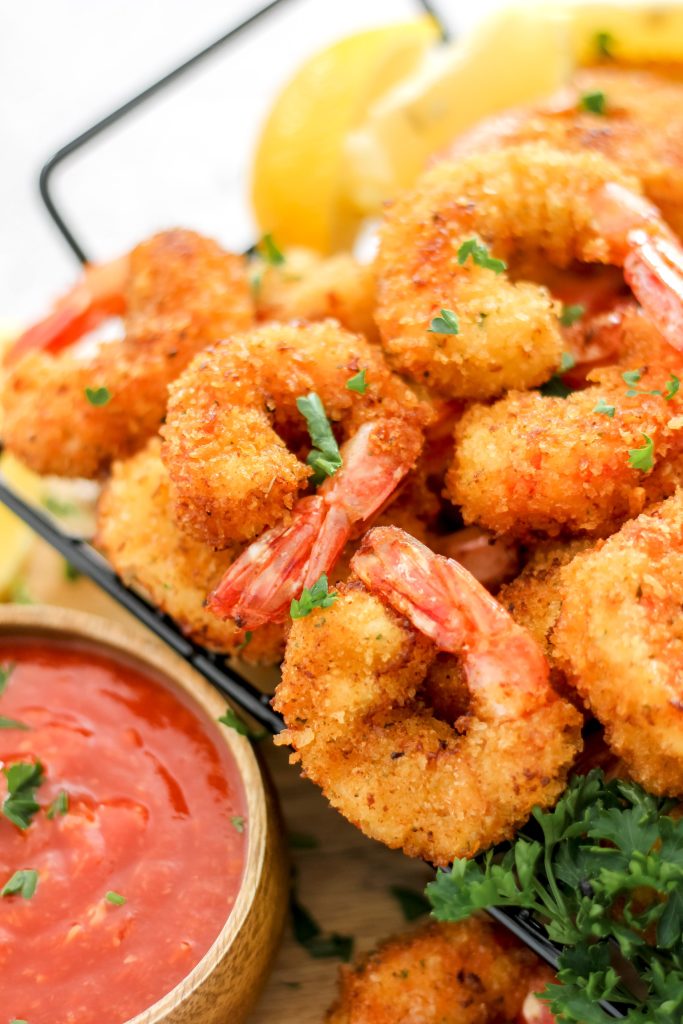
For the ultimate crunch, panko breadcrumbs are a game-changer. Panko, a Japanese-style breadcrumb, is made from white bread that has been processed into flakes and then baked. This results in larger, airier crumbs that absorb less oil and create an exceptionally crispy texture that holds up remarkably well.
Seasoning is key to flavor. Don’t be shy with your spices. Beyond salt and pepper, consider paprika for a hint of smokiness and color, garlic powder and onion powder for depth, and perhaps a pinch of cayenne pepper for a subtle kick. For seafood, a touch of dried dill or parsley can also be a delightful addition. Always season both the flour mixture and the breadcrumbs.
The choice of frying oil and its temperature are critical factors. Use a neutral oil with a high smoke point, such as canola, vegetable, or peanut oil. The oil should be heated to the correct temperature, typically between 350°F and 375°F (175°C to 190°C). Too low a temperature will result in greasy, soggy seafood as it absorbs too much oil. Too high, and the coating will burn before the seafood is cooked through.
Using a thermometer to monitor the oil temperature is essential. A deep-fry thermometer clipped to the side of your pot is an invaluable tool. If you don’t have one, you can test the oil by dropping a small piece of breading into it; it should sizzle vigorously and float to the surface immediately.
Don’t overcrowd the pan. Frying in small batches is crucial. Adding too much seafood at once will lower the oil temperature significantly, leading to greasiness and a lack of crispness. Allow the oil to return to the proper temperature between batches. This ensures consistent cooking and optimal crispiness.
The cooking time will vary depending on the type and size of the seafood. Shrimp and small fish fillets cook quickly, usually in just a few minutes per side. Scallops are even faster. Overcooking is a common mistake that can lead to dry, tough seafood, even if the exterior is crispy. Cook until the seafood is just opaque and cooked through.
Once fried, the seafood needs to drain properly. Use a wire rack set over a baking sheet instead of paper towels. Placing fried food directly on paper towels traps steam and can make the bottom soggy. The wire rack allows air to circulate around the seafood, maintaining its crispiness.
For truly long-lasting crispiness, consider a ‘double fry’ technique, especially for items like calamari rings or fish fillets. The first fry is done at a slightly lower temperature (around 325°F/160°C) until the seafood is cooked through but not yet deeply colored. Remove, drain, and let cool slightly. Then, a second fry at a higher temperature (375°F/190°C) for a shorter time crisps up the coating to perfection. This creates an incredibly stable, crunchy exterior.
Another advanced technique to enhance crispiness is the use of a ‘slurry’ or ‘batter’ instead of just flour and breadcrumbs. A light tempura-style batter, made with flour, cornstarch, and ice-cold water or sparkling water, can create an exceptionally delicate and crispy coating. The key is to keep the batter cold and use it immediately.
Consider adding a binder to your flour dredge. A light dusting of cornstarch or rice flour over the seafood after the initial flour dredge, before the egg wash, can help create an even more robust and crispy crust. This acts as a secondary drying agent and helps the egg wash adhere better.
For fish, choosing the right cut is important. Fillets like cod, haddock, or tilapia are excellent choices for frying. Ensure they are relatively uniform in thickness for even cooking. For shrimp, larger ones tend to hold up better and are more forgiving during the frying process.
When preparing your seasoned flour, ensure it’s well-mixed. Clumps of seasoning can lead to uneven flavor distribution and potential burning. Sifting the flour mixture can help ensure a uniform coating.
The type of pot used for frying matters. A heavy-bottomed Dutch oven or a deep, sturdy pot is ideal. These pots distribute heat evenly and maintain a stable oil temperature better than thin-walled pans.
For those looking for a healthier alternative without sacrificing crispiness, air frying is an option. While not traditional deep-frying, modern air fryers can achieve a remarkably crispy texture with significantly less oil. Coat the seafood as usual and cook according to your air fryer’s instructions, often with a light spray of oil.
Another strategy for maintaining crispiness, especially if serving buffet-style, is to keep the fried seafood warm in a low oven. Place the drained seafood on a wire rack on a baking sheet and keep it in a preheated oven set to around 200°F (95°C). This keeps it warm and crisp without further cooking.
The importance of resting the seafood after frying cannot be overstated. Allow it to rest on the wire rack for at least a minute or two after removing it from the oil. This allows excess oil to drip away and the crust to set further.
Consider the environmental factors. High humidity can make it more challenging to achieve and maintain crispiness. Try to fry on a dry day if possible, or ensure good ventilation in your kitchen.
For a unique twist, experiment with different breadcrumb alternatives. Crushed cornflakes, finely crushed crackers, or even a blend of semolina and flour can offer interesting textural variations and enhanced crispiness.
When it comes to fish and chips, the batter is everything. A classic beer batter uses flour, a leavening agent (like baking powder), and cold beer. The carbonation in the beer helps create a lighter, crispier batter, and the alcohol evaporates quickly, contributing to crispness.
For shrimp, consider marinating them briefly in a mixture of lemon juice and spices before drying and coating. This adds an extra layer of flavor and can help tenderize the shrimp.
Salt is a flavor enhancer, but over-salting the coating can make the seafood taste too salty. Season judiciously and taste your coating mixture before applying it.
Finally, serve your crispy fried seafood immediately for the absolute best experience. While these techniques aim for longevity, nothing beats the unparalleled crispness of freshly fried food.
Mastering the art of long-lasting crispy fried seafood involves a combination of meticulous preparation, the right coating ingredients, precise frying techniques, and proper draining. By paying attention to each of these elements, you can consistently achieve restaurant-quality results in your own kitchen, ensuring every bite is a delightful crunch.