Shucking oysters at home offers a multitude of benefits that extend beyond mere convenience. Firstly, it guarantees unparalleled freshness; oysters taste best moments after being opened. Secondly, it can be significantly more cost-effective than ordering them at high-end establishments. Finally, there’s an immense sense of accomplishment and a unique connection to your food when you prepare it from its rawest form, making the entire dining experience far more personal and memorable.
Before diving into the exciting world of oyster shucking, it is paramount to emphasize safety. Oysters, with their rugged shells and tight seals, require specific tools and careful handling. The primary risk is accidental injury from the oyster knife or the sharp edges of the shell. By adhering to proper techniques and using the right protective gear, you can minimize these risks and ensure a pleasant, injury-free experience.
To begin your oyster shucking journey, assembling the correct tools is crucial. Attempting to open oysters with inadequate implements can be dangerous and frustrating. Invest in quality equipment, as it will make the process smoother, safer, and more enjoyable, allowing you to focus on the delicate task at hand rather than struggling with unsuitable gear.
The most critical tool is an oyster knife. Unlike a regular kitchen knife, an oyster knife has a short, sturdy, non-flexible blade with a pointed or slightly rounded tip, designed to withstand the leverage needed to pry open shells. There are various styles, including New Haven, Boston, and French, each with slight variations in blade shape and handle ergonomics. Choose one that feels comfortable and secure in your hand.
Next, cut-resistant gloves are an absolute must. These specialized gloves, often made with high-performance polyethylene or similar materials, provide a vital layer of protection against accidental slips and cuts. While a thick kitchen towel can offer some protection, a dedicated glove on your non-dominant hand (the one holding the oyster) is highly recommended for maximum safety and peace of mind.
You will also need a thick, folded kitchen towel or a specialized oyster shucking mat. This provides a stable, non-slip surface for holding the oyster firmly and protects your countertop from scratches. A sturdy surface, like a cutting board placed on a stable counter, is essential for applying the necessary force without the oyster sliding around.
Finally, have a bowl for discarded shells, a small brush for cleaning oysters, and your desired accompaniments ready. Lemons, mignonette, hot sauce, and cocktail sauce are classic pairings that enhance the oyster’s natural flavor. Having everything within reach will streamline your shucking process and allow for immediate enjoyment once the oysters are opened.
Selecting fresh, high-quality oysters is the cornerstone of a delightful shucking experience. Always source your oysters from reputable fishmongers or seafood markets that store them properly. Look for oysters that are tightly closed; an open oyster indicates it is either dead or dying and should be avoided. If an oyster is slightly ajar, tap it gently – if it snaps shut, it’s still alive and safe to consume.
Visually inspect the shells: they should be clean, free of cracks, and feel heavy for their size, indicating they are full of liquor (the natural briny liquid inside). A strong, pleasant scent of the ocean is a good sign; any strong, off-putting, or fishy odor is a red flag. Trust your senses; if an oyster doesn’t look or smell right, err on the side of caution and discard it.
Before you begin shucking, prepare your workspace. Ensure your counter is clean and clear of clutter. Place your folded towel or shucking mat firmly on the counter. Have your oyster knife, cut-resistant glove, and a bowl for shells within easy reach. Good lighting is also beneficial to clearly see the oyster’s hinge and muscle attachment points. A well-organized station promotes efficiency and safety.
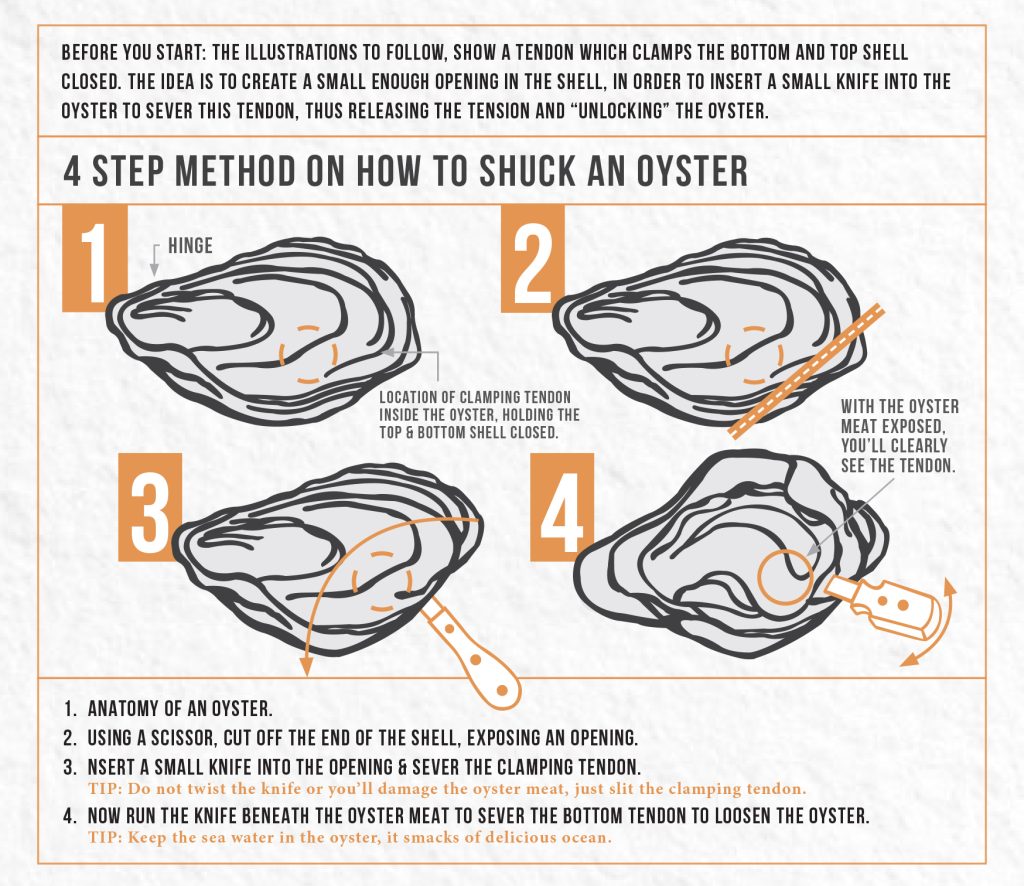
Understanding the basic anatomy of an oyster will significantly aid your shucking process. Each oyster has two shells: a deeper, cup-shaped shell (the bottom shell) and a flatter, lid-like shell (the top shell). These shells are joined at a narrow point called the hinge and held together by a strong adductor muscle located roughly two-thirds of the way from the hinge towards the opposite, rounded end.
The goal of shucking is to separate these shells by finding the hinge or a weak point, inserting the knife, and then severing the adductor muscle. Once the muscle is cut, the shells will easily part, revealing the plump oyster meat nestled in its briny liquor. Knowing where these key features are will guide your knife placement and minimize unnecessary force.
There are two primary methods for opening oysters: the hinge method and the side method. The hinge method is generally recommended for beginners as it offers a more stable point of entry and greater leverage. The side method, while faster for experienced shuckers, requires more precision and can be more challenging for novices.
Let’s detail the Hinge Method first. Begin by holding the oyster firmly in your gloved non-dominant hand, cup-side down, with the hinge facing you. Position the oyster on your towel, ensuring it’s stable and won’t slip. This secure grip is fundamental to preventing accidents and effectively applying pressure.
Once the tip of the knife is securely in the hinge, twist the knife handle gently but firmly, as if turning a key. You should feel a slight pop as the hinge gives way and the shells begin to separate. Avoid prying with brute force, as this can break the shell and send fragments into the oyster meat or cause the knife to slip.
Carefully remove the top shell, discarding it into your shell bowl. Inspect the oyster for any small shell fragments that may have broken off during shucking. Use the tip of your knife to gently dislodge and remove any fragments, ensuring a clean eating experience. You want to preserve as much of the natural liquor as possible.
Finally, slide the knife underneath the oyster meat to detach it from the bottom (cup) shell. This allows the oyster to be easily slurped from its shell. Some prefer to flip the oyster over at this point, presenting a more aesthetically pleasing, plump side upwards. Keep the oyster cold on a bed of ice until ready to serve.
Now, for the more advanced Side Method. This technique involves finding a weak point along the side seam of the oyster, typically closer to the hinge but not directly in it. Hold the oyster cup-side down, similar to the hinge method, but orient it so one of the side seams is facing you.
Carefully insert the tip of the oyster knife into the side seam, applying gentle pressure and wiggling until you find an entry point. Once the knife is in, twist it to pop the shells open. This method often requires a bit more finesse and familiarity with oyster shell structures to identify the ideal entry point.
Once the shells are slightly separated, proceed as with the hinge method: slide the knife along the inside of the top shell to sever the adductor muscle, remove the top shell, clean any fragments, and detach the oyster from the bottom shell. This method is often preferred by professional shuckers for its speed once mastered.
After shucking, it’s crucial to keep your oysters chilled. Place them immediately on a bed of crushed ice or a chilled platter. Oysters are best consumed within a very short time after shucking, ideally within an hour or two, to enjoy their peak freshness and flavor. Serve them with your preferred condiments.
Several common mistakes can hinder your shucking success. Using the wrong tools, such as a butter knife or screwdriver, is a recipe for disaster and injury. Applying excessive force rather than leveraging the knife can lead to broken shells or slips. Not protecting your hands is a critical safety oversight. Always ensure your workspace is stable to prevent the oyster from sliding.
Another common error is leaving shell fragments in the oyster. Always take a moment to carefully inspect and clean the oyster after opening. Lastly, not keeping oysters cold before and after shucking can compromise their safety and flavor. Maintain proper refrigeration at all times.
Occasionally, you’ll encounter a stubborn oyster. If the hinge proves impenetrable, try rotating the oyster and attempting the side method. Sometimes, a slight change in angle or a different entry point can make all the difference. For particularly brittle shells, apply gentler, more controlled pressure to avoid excessive breakage.
Oysters are wonderfully versatile and pair beautifully with a variety of accompaniments. The classic mignonette, a simple sauce of minced shallots, black pepper, and red wine vinegar, perfectly complements their briny profile. Fresh lemon wedges, a dash of hot sauce, or a dollop of cocktail sauce are also popular choices. For beverages, crisp white wines like Muscadet or Sauvignon Blanc, dry sparkling wines, and lighter beers are excellent pairings.
Beyond their exquisite taste, oysters are a nutritional powerhouse. They are rich in essential vitamins and minerals, including zinc, iron, selenium, and Vitamin B12. While the aphrodisiac claims are largely anecdotal, their nutrient density certainly contributes to overall well-being. Enjoying oysters is not just a culinary delight but also a healthy indulgence.
As you become more adept at shucking, you might explore different oyster varieties. From the briny, firm Pacific oysters to the sweet, creamy Kumamotos, or the crisp, mineral Bluepoints, each offers a unique flavor profile influenced by its specific merroir (the marine equivalent of terroir). Experimentation will deepen your appreciation for these diverse bivalves.
Proper storage of unshucked oysters is vital for maintaining their freshness. Store them cup-side down (to retain their liquor) in a single layer in an open container, covered with a damp cloth, in the coldest part of your refrigerator. They can typically last for 5-7 days this way. Avoid storing them in airtight containers or submerged in water, as this can kill them.
Storing shucked oysters is generally not recommended as they lose their freshness rapidly. If absolutely necessary, place them in their liquor in an airtight container and refrigerate for no more than 1-2 days. However, for the best experience, shuck just before serving.
The journey from a closed, unassuming shell to a glistening, ready-to-eat delicacy is incredibly satisfying. Mastering the art of oyster shucking is more than just a kitchen skill; it’s an invitation to a unique culinary experience, a deeper connection to seafood, and the pure joy of sharing freshly prepared ocean bounty with friends and family. With practice, patience, and adherence to safety guidelines, you too can become a confident oyster shucker.
Embrace the challenge, savor the process, and delight in the exquisite reward. By following this comprehensive tutorial, you are now equipped with all the knowledge to safely and expertly shuck fresh oysters, bringing the sophisticated pleasure of a raw bar right into your home. Enjoy every briny, succulent bite!