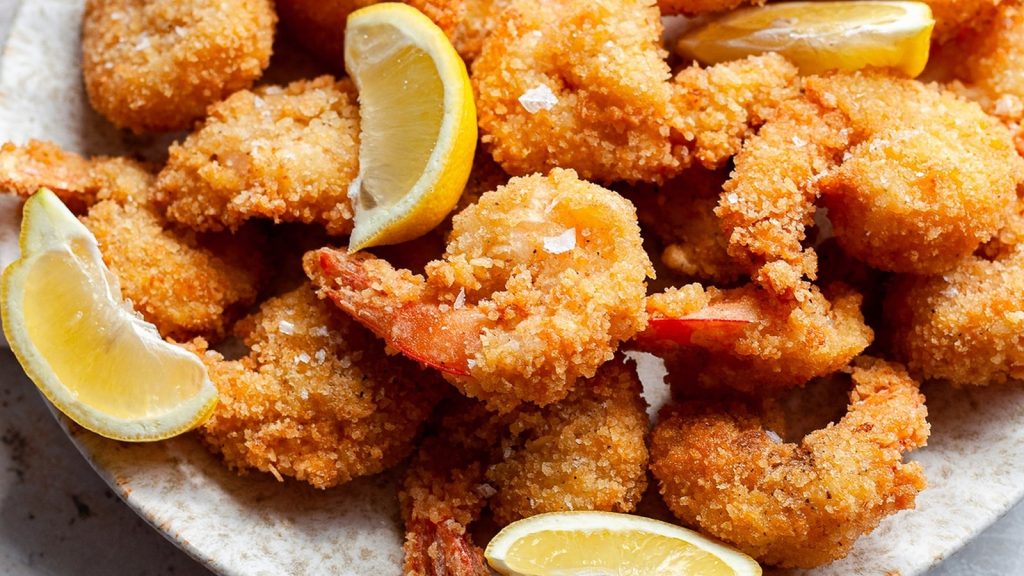
While the concept seems simple—fry some shrimp and toss them in mayo—the execution distinguishes a soggy, greasy appetizer from a restaurant-quality masterpiece. Mastering this dish requires attention to detail at every stage, from selecting the raw ingredients to the precise temperature of the oil. This guide will delve deep into the technical aspects of preparing this dish, ensuring that your home-cooked version rivals that of high-end seafood establishments.
Selecting the Perfect Crustacean
The foundation of this dish is, naturally, the shrimp. For breaded fried shrimp, size matters significantly. You want a prawn that can withstand the breading process without disappearing inside the crust. Black Tiger Prawns or large White Shrimp are the ideal candidates. Look for sizes labeled U15 or U20 (meaning 15 to 20 shrimp per pound). These sizes offer a substantial bite and maintain their juiciness during the high-heat frying process.
Freshness is paramount. If you have access to fresh-caught shrimp, look for firm shells and a clean, ocean-like scent. However, in many culinary contexts, individually quick-frozen (IQF) shrimp are a superior option as they are frozen immediately after harvest, preserving their texture better than ‘fresh’ shrimp that have been sitting on a supermarket counter for days. Always defrost shrimp slowly in the refrigerator or under cold running water; never use warm water or a microwave, as this will begin cooking the proteins prematurely.
The Art of Cleaning and Preparation
Once thawed, the preparation phase begins. Peel the shrimp, but leave the tail segment intact. The tail serves a dual purpose: it acts as a convenient handle for eating and adds an elegant aesthetic to the final presentation. Deveining is non-negotiable for a professional result. Run a small paring knife along the back of the shrimp to remove the digestive tract, ensuring a clean and gritty-free experience.
The Secret Technique: Straightening the Shrimp
Have you ever wondered why restaurant-style Ebi Furai (fried shrimp) is perfectly straight, while homemade versions curl up into tight rounds? The secret lies in the preparation of the muscle fibers. When shrimp cook, the connective tissues on the belly tighten, causing the curl. To prevent this, you must perform a technique often referred to as ‘scoring’.
Flip the peeled shrimp so the belly faces up. Make several shallow, diagonal incisions along the belly, spaced about half an inch apart. Be careful not to cut all the way through. Once scored, flip the shrimp over onto its back. Using your fingers, gently press down along the length of the shrimp until you feel a slight ‘pop’ or snap. This action breaks the connective tissue, allowing the shrimp to remain elongated and elegant during frying.
The Breading Station: Achieving the Crunch
The coating for this dish is typically a three-step process involving flour, egg wash, and breadcrumbs. For the ultimate texture, Panko breadcrumbs are essential. Unlike traditional fine breadcrumbs, Panko is coarser and flakier, absorbing less oil and creating a lighter, airier crust that stays crispy longer.
Set up your station with three shallow bowls. The first bowl should contain all-purpose flour seasoned with a pinch of salt, white pepper, and garlic powder. Seasoning the flour ensures the flavor is built into the shrimp, not just sitting on top. The second bowl contains beaten eggs; adding a splash of water or milk to the eggs can help thin the mixture for a more even coating.
The third bowl holds the Panko. A professional tip is to spray the Panko lightly with water or mist it before use. This might sound counterintuitive, but slightly moistened Panko adheres better and browns more evenly without burning before the shrimp is fully cooked inside.
The Dredging Process
To bread the shrimp, use the ‘wet hand, dry hand’ method to keep your fingers clean. Hold the shrimp by the tail and dredge it in the seasoned flour, shaking off any excess. A thick layer of flour will prevent the egg from sticking, causing the breading to slide off later. Next, dip it into the egg wash, ensuring complete coverage.
Finally, lay the shrimp into the bed of Panko. Don’t just roll it; press the breadcrumbs gently into the flesh. This pressure ensures a thick, uniform coating that won’t flake off in the fryer. Once breaded, place the shrimp on a wire rack and let them rest in the refrigerator for 15 to 20 minutes. This resting period allows the gluten to relax and the coating to set, significantly reducing the chance of ‘bald spots’ after frying.
Frying Dynamics and Oil Management
The choice of oil is critical. You need a neutral oil with a high smoke point, such as canola, vegetable, or peanut oil. Olive oil or butter has a smoke point that is too low and will burn, imparting a bitter taste. Fill a deep pot or wok with enough oil to submerge the shrimp completely.
Temperature control is the single most important variable in frying. The target temperature is 350°F to 375°F (175°C to 190°C). If the oil is too cool, the breadcrumbs will soak up grease like a sponge, resulting in a heavy, oily product. If the oil is too hot, the outside will burn before the interior is cooked. Using a kitchen thermometer is highly recommended for consistency.
Fry the shrimp in small batches. Overcrowding the pan causes the oil temperature to plummet rapidly. When the temperature drops, the shrimp steam rather than fry, leading to a soggy crust. Drop the shrimp in away from you to avoid splashing. They should sizzle aggressively immediately upon contact with the oil.
The shrimp are done when the Panko turns a deep golden brown and the shrimp float to the surface. This usually takes only 2 to 3 minutes depending on size. Overcooking shrimp results in a rubbery texture, so vigilance is key. Remove them with a slotted spoon or spider strainer and place them on a wire rack or paper towels to drain excess oil immediately.
Crafting the Mayonnaise Sauce
The ‘Mayones’ component of Udang Goreng Tepung Roti is rarely just plain mayonnaise out of a jar. To achieve a gourmet flavor profile, the mayonnaise must be transformed into a balanced sauce. A popular variation involves a sweet and creamy profile, often found in Honey Walnut Shrimp recipes.
Start with a base of high-quality, full-fat mayonnaise. Japanese mayonnaise (like Kewpie) is preferred for its richer, yolk-heavy flavor and slight umami kick. To this, add a sweetener. Sweetened condensed milk is a secret ingredient in many Asian kitchens, providing both sweetness and a milky richness that pairs perfectly with fried seafood. Alternatively, honey can be used for a floral sweetness.
To cut through the richness of the mayo and the fried batter, an acidic element is necessary. A squeeze of fresh lemon juice or a teaspoon of rice vinegar brightens the sauce and prevents it from feeling too heavy on the palate. For those who enjoy a bit of heat, a dash of Sriracha or chili oil can turn this into a ‘Bang Bang’ style sauce.
Mixing and Coating
There are two schools of thought regarding the application of the sauce: dipping or tossing. For the crispest experience, serve the mayonnaise sauce on the side or drizzled artistically over the top. This preserves the integrity of the Panko crust until the very last moment.
However, if you prefer the shrimp to be fully glazed—similar to the Chinese banquet style—toss the fried shrimp in the sauce immediately before serving. Use a large bowl and gently fold the shrimp in the sauce to coat them evenly without breaking the crust. If you choose this method, serve immediately, as the sauce will eventually soften the breading.
Plating and Presentation
Visual appeal is part of the dining experience. Serve the shrimp on a bed of finely shredded cabbage or lettuce. The fresh greens not only provide a color contrast but also offer a crisp, cleansing texture to balance the fried elements. Garnish with thinly sliced scallions, toasted sesame seeds, or candied walnuts to add complexity to the dish.
Troubleshooting Common Issues
If you find that your breading is falling off during frying, it is likely due to one of two reasons: the shrimp was too wet before flouring, or the oil was not hot enough. Ensure the shrimp are patted dry with paper towels before the flour step. If the shrimp are tough, they were likely overcooked. Remember, shrimp continue to cook slightly from residual heat even after being removed from the oil.
Dietary Variations
For those with dietary restrictions, this technique can be adapted. Gluten-free flour and gluten-free Panko (often made from rice or chickpeas) can be substituted with excellent results. For an egg-free version, a batter made of cornstarch and water can act as the binding agent, though the crust may be slightly harder.
Conclusion
Preparing Udang Goreng Tepung Roti dengan Mayones is a rewarding culinary endeavor that combines precise technique with indulgent flavors. By meticulously cleaning and straightening the prawns, ensuring a proper three-stage breading process, and managing your frying temperature, you elevate a simple dish into a gourmet experience. Whether served as an elegant appetizer or a main course, this dish is a testament to the fact that great cooking lies in the details.
:max_bytes(150000):strip_icc()/ebi-fry-fried-shrimp-2031450-hero-01-46c436a89c164a9ab5980f888097fcd2.jpg "Mastering the Art of Breaded Fried Shrimp with Creamy Mayonnaise: A Culinary Guide")