Venturing beyond the traditional, our focus today is on crafting Takoyaki that highlights the exquisite textures and flavors of shrimp (ebi) and squid (ika). This innovative pairing not only offers a refreshing take on the classic but also introduces a different dimension of seafood richness. The sweetness of shrimp complements the subtle brininess of squid, creating a harmonious blend that is both sophisticated and incredibly satisfying. Preparing Takoyaki at home is a rewarding culinary journey, transforming your kitchen into a vibrant Japanese food stall.
The decision to use shrimp and squid as fillings is driven by several factors. Shrimp offers a delicate sweetness and a firm, succulent bite, providing a delightful contrast to the soft batter. Squid, known for its unique texture – slightly chewy yet tender when cooked correctly – adds another layer of complexity and a distinct oceanic flavor. Together, they create a filling that is both substantial and wonderfully balanced, appealing to those who appreciate diverse seafood profiles or are looking for an alternative to octopus.
Beyond the ingredients, the art of making Takoyaki lies in mastering the technique. It’s a dance of heat, timing, and dexterity, culminating in perfectly golden-brown spheres. This article will equip you with all the knowledge, from selecting the finest ingredients to the intricate steps of pouring, filling, and flipping, ensuring your homemade Takoyaki are nothing short of spectacular. We’ll also explore the cultural significance and tips for troubleshooting common challenges, making your Takoyaki-making experience seamless and enjoyable.
At the heart of any great Takoyaki is its batter. Achieving the right consistency is paramount – it should be thin enough to pour easily and spread evenly in the molds, yet robust enough to form a crisp shell and hold the fillings without breaking apart. The batter typically consists of flour, dashi stock (a fundamental Japanese broth), eggs, and a leavening agent. Dashi is key, infusing the batter with a foundational layer of umami that elevates the entire dish.
To prepare an exceptional Takoyaki batter, gather the following ingredients:
- 200g all-purpose flour
- 2 large eggs
- 700ml dashi stock (homemade or instant)
- 1 teaspoon baking powder
- 1/2 teaspoon salt
- 1 tablespoon soy sauce (optional, for extra umami)
- 1 tablespoon mirin (optional, for a hint of sweetness)
Ensure all ingredients are at room temperature for optimal mixing and batter consistency.
Begin by sifting the all-purpose flour and baking powder together into a large mixing bowl. Sifting prevents lumps and ensures a smooth batter. In a separate bowl, whisk the eggs until well combined. Gradually add the dashi stock to the eggs, whisking continuously. Incorporate the salt, soy sauce, and mirin, if using. Now, slowly pour the wet ingredients into the dry ingredients, whisking gently until just combined. Be careful not to overmix, as this can develop the gluten too much, resulting in tough Takoyaki. The batter should be smooth, pourable, and free of lumps. Cover the bowl and let it rest in the refrigerator for at least 30 minutes, or up to an hour. This resting period allows the gluten to relax and the flavors to meld, leading to a more tender and flavorful Takoyaki.
The stars of our Takoyaki show are undoubtedly the shrimp and squid. Quality is crucial here. Opt for fresh, sustainably sourced seafood whenever possible. For shrimp, medium-sized varieties work best, as they provide a good bite without overwhelming the Takoyaki. For squid, choose smaller, tender tubes, often labeled as calamari, which cook quickly and remain tender.
Preparing the shrimp is straightforward. Start by peeling and deveining the shrimp. You can leave the tails on for presentation if you wish, but for Takoyaki, it’s best to remove them for easier eating. Once cleaned, pat the shrimp dry with paper towels to remove excess moisture, which can affect cooking. Then, dice the shrimp into small, manageable pieces, roughly 0.5 cm to 1 cm in size. This ensures they cook evenly and fit snugly within the Takoyaki spheres.
Preparing the squid requires a little more attention to ensure tenderness. Begin by cleaning the squid tubes thoroughly, removing the clear quill, entrails, and any skin. Rinse the tubes under cold water. To tenderize, you can lightly score the inside of the squid tubes in a crosshatch pattern, or blanch them briefly in boiling water for about 30 seconds before immediately plunging into an ice bath. Pat dry and then dice the squid into pieces similar in size to the shrimp, about 0.5 cm to 1 cm. Uniform sizing helps with even cooking and distribution within the Takoyaki.
Beyond the main proteins, several other fillings contribute significantly to the authentic Takoyaki experience:
- Tenkasu (tempura scraps): These provide a wonderful crunch and absorb the flavorful batter.
- Beni Shoga (pickled red ginger): Adds a piquant, refreshing bite that cuts through the richness.
- Green Onions (scallions): Offers a fresh, aromatic counterpoint and a hint of sharpness.
Ensure these are finely chopped and ready to be sprinkled into the molds.
No Takoyaki is complete without its iconic toppings. These not only enhance the flavor but also add visual appeal:
- Takoyaki Sauce: A sweet and savory brown sauce, similar to Worcestershire but thicker and sweeter.
- Japanese Mayonnaise: Often Kewpie brand, known for its rich, umami flavor.
- Katsuobushi (bonito flakes): These dried, fermented, and smoked skipjack tuna flakes dance and curl from the heat of the Takoyaki, adding a smoky, savory depth.
- Aonori (dried green seaweed flakes): Provides a hint of ocean flavor and vibrant color.
Have these ready for a grand finish.
To embark on your Takoyaki journey, you’ll need specialized equipment:
- Takoyaki Pan: A cast iron or non-stick pan with hemispherical molds is essential.
- Takoyaki Picks/Skewers: Two thin, pointed metal or bamboo skewers are crucial for flipping and rotating the Takoyaki.
- Oil Brush: For lightly greasing the molds.
- Ladle: For pouring the batter.
- Small Bowls: For holding the prepared fillings and toppings.
Having these tools organized and within reach will streamline the cooking process.
Let’s begin the cooking process. First, ensure your batter has rested for the recommended time. Give it a gentle whisk just before use to ensure everything is evenly suspended. The consistency should be like thin pancake batter, flowing smoothly from the ladle. If it’s too thick, add a tiny bit more dashi; if too thin, a spoonful of flour, whisking well each time.
Have all your prepared fillings – diced shrimp, diced squid, tenkasu, beni shoga, and chopped green onions – in separate small bowls, easily accessible next to your Takoyaki pan. The cooking process moves quickly, so having everything mise en place is vital for success. This preparation ensures a smooth and efficient assembly line once the pan is hot.
Place the Takoyaki pan over medium-high heat. Allow it to heat thoroughly for several minutes. This is crucial for achieving a crispy crust. Once hot, lightly brush each mold with a generous amount of oil. You can use vegetable oil, canola oil, or even a blend of oil and butter for extra flavor. Ensure the oil coats the entire surface of each mold and spills slightly onto the flat surface of the pan between the molds.
Using a ladle, pour the Takoyaki batter into each mold, filling them to the brim. Don’t be afraid if the batter overflows slightly and connects the molds; this is part of the technique for forming perfect spheres. The excess batter will be incorporated later during the flipping process. Work quickly but carefully to ensure an even distribution.
Immediately after pouring the batter, begin adding your fillings. Sprinkle a few pieces of diced shrimp and squid into each mold. Follow with a pinch of tenkasu, a small amount of beni shoga, and a sprinkle of green onions. Distribute these evenly among all the molds. The batter will still be quite liquid at this stage, allowing the fillings to settle nicely within the nascent Takoyaki.
As the batter cooks, you’ll notice the edges starting to set and crisp up, and bubbles appearing on the surface. This is your cue for the first crucial flip. Using one Takoyaki pick, gently separate the batter around the edge of one mold. Then, using both picks, carefully push one side of the partially cooked sphere into the mold, rotating it 90 degrees so that the cooked side faces up and the uncooked batter flows into the mold, forming a new bottom.
Continue this process, rotating each Takoyaki. The goal is to keep turning them, using the picks to scrape the excess batter from the flat surface of the pan into the molds as you rotate. This technique helps create the spherical shape. Don’t worry if your first few attempts aren’t perfect; practice makes perfect. Keep turning and rotating, ensuring all sides get evenly cooked and form a beautiful golden-brown crust.
Once the Takoyaki are semi-spherical, reduce the heat to medium. Continue to rotate them frequently, using your picks to gently push and turn them around in the molds. This ensures even cooking and browning on all sides. The Takoyaki are ready when they are uniformly golden brown, firm to the touch, and make a hollow sound when tapped. This usually takes about 5-7 minutes per batch, depending on your pan and heat level.
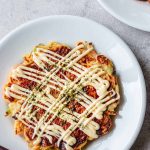
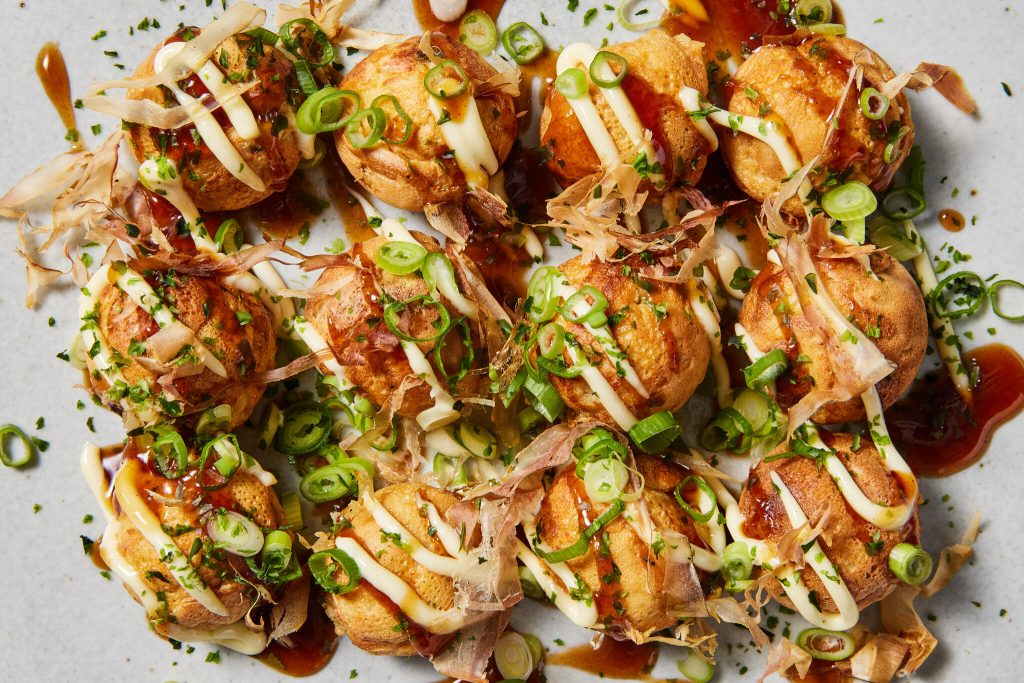
Carefully remove the cooked Takoyaki from the pan and arrange them on a serving plate. Now comes the fun part: topping them! Drizzle generously with Takoyaki sauce, followed by a zig-zag of Japanese mayonnaise. Finish with a shower of katsuobushi (bonito flakes) which will dance on the hot Takoyaki, and a sprinkle of aonori (dried green seaweed flakes). Serve immediately, as Takoyaki are best enjoyed hot.
Tips for Perfect Takoyaki: Batter Consistency. The batter is the foundation. It should be thin enough to pour easily, but not watery. If it’s too thick, your Takoyaki will be dense; too thin, and they might fall apart. Adjust with small amounts of dashi or flour until it resembles thin pancake batter. A good test is to dip a spoon in; the batter should coat the back of the spoon thinly.
Tips for Perfect Takoyaki: Heat Control. Proper heat is vital. Start with medium-high heat to get a good initial crust, then reduce to medium to ensure the inside cooks through without burning the exterior. An evenly heated pan is crucial, so allow your Takoyaki pan to heat up thoroughly before adding batter.
Tips for Perfect Takoyaki: Mastering the Flip. The flip is the most challenging but also the most satisfying part. Don’t rush it. Wait until the batter around the edges and bottom has set and is slightly crispy. Use two picks for better control. Practice makes perfect; your first batch might be a bit rustic, but you’ll quickly get the hang of it.
Tips for Perfect Takoyaki: Don’t Overcrowd. While it’s tempting to fill every mold, especially in larger pans, avoid overcrowding the pan with too many fillings. This can make flipping difficult and lead to uneven cooking. A balanced amount ensures each Takoyaki is perfectly formed and cooks efficiently.
Troubleshooting Common Issues: Sticking. If your Takoyaki are sticking to the molds, it’s likely due to insufficient oil or a pan that isn’t hot enough. Ensure you generously oil each mold and allow the pan to reach the correct temperature before pouring batter. A well-seasoned cast iron pan also helps prevent sticking.
Troubleshooting Common Issues: Uneven Cooking. Uneven cooking can result from inconsistent heat distribution or insufficient rotation. Make sure your pan is evenly heated across all molds. During cooking, continuously rotate the Takoyaki to expose all sides to the heat, ensuring a uniform golden-brown exterior and a thoroughly cooked interior.
Troubleshooting Common Issues: Too Soft or Too Hard. If your Takoyaki are too soft inside, they might need more cooking time or slightly higher heat. If they’re too hard or dense, your batter might be too thick, or you might have overcooked them. Adjust batter consistency and cooking duration as needed.
Customizing Your Takoyaki: Other Fillings. The beauty of Takoyaki is its versatility. Feel free to experiment with other fillings such as cheese, corn, kimchi, or even different types of seafood like scallops or imitation crab meat. Just ensure they are finely diced and cook relatively quickly.
Customizing Your Takoyaki: Sauce Variations. While traditional Takoyaki sauce is classic, you can explore other sauces. Try a spicy mayonnaise by adding sriracha, a sweet chili sauce, or even a drizzle of teriyaki sauce for a different flavor profile. A squeeze of lemon juice can also add a refreshing zest.
The history of Takoyaki traces back to Osaka, Japan, in the 1930s, credited to a street vendor named Tomekichi Endo. He was inspired by Akashi-yaki, a small, egg-rich dumpling from Akashi City, and transformed it by adding octopus and cooking it in a special cast-iron mold. Takoyaki quickly became a symbol of Osaka’s vibrant street food culture and spread throughout Japan, becoming a beloved snack and a staple at festivals and street markets.
While Takoyaki is often considered an indulgence, incorporating shrimp and squid can offer some nutritional benefits. Shrimp is a great source of lean protein, selenium, and B vitamins, while squid provides protein, omega-3 fatty acids, and essential minerals like copper and iron. To make it a bit healthier, you can opt for less oil, use a lighter hand with the sauces, and pack in more green onions or other vegetables. The dashi broth itself is low in calories and rich in umami, reducing the need for excessive salt.
Takoyaki pairs wonderfully with a variety of beverages. For a truly authentic experience, enjoy them with a cold Japanese beer or a refreshing sake. Non-alcoholic options include green tea, which cleanses the palate, or even a simple glass of iced water to balance the rich flavors. The contrast between the hot, savory Takoyaki and a cool drink is particularly delightful.
If you happen to have leftover Takoyaki, store them in an airtight container in the refrigerator for up to 2 days. To reheat, the best method is to use a toaster oven or a conventional oven at 180°C (350°F) for about 10-15 minutes until heated through and the exterior regains some crispness. Microwaving is also an option, but it tends to make the Takoyaki softer and less crispy.
Crafting Takoyaki with shrimp and squid is an incredibly rewarding culinary adventure that brings a piece of Japanese culture into your home. From the careful preparation of the batter and fillings to the satisfying flip and the final dressing, each step is an opportunity to create something truly delicious. Embrace the process, experiment with flavors, and most importantly, enjoy the delightful spheres of flavor you’ve created. Happy Takoyaki making!