While pork (especially thinly sliced pork belly) is a common addition, seafood okonomiyaki offers a delightful alternative, bringing the fresh taste of the ocean to this comforting dish. The combination of succulent shrimp, tender squid, and flaky fish, nestled within a fluffy cabbage-filled batter, creates an unforgettable culinary experience. This article aims to provide practical, easy-to-follow tips for crafting an exceptional seafood okonomiyaki right in your own kitchen.
Many home cooks might find the idea of making authentic Japanese dishes daunting, but okonomiyaki is surprisingly forgiving and adaptable. With the right techniques and a few key ingredients, you can recreate the magic of a Japanese teppanyaki grill at home, impressing family and friends with your culinary prowess. Let’s dive into the world of practical seafood okonomiyaki.
At its core, okonomiyaki features a simple batter made from flour, eggs, and dashi (Japanese soup stock), mixed with generous amounts of shredded cabbage and various fillings. The mixture is then grilled on a griddle or frying pan until golden brown and cooked through, before being adorned with a rich okonomiyaki sauce, Japanese mayonnaise, katsuobushi (bonito flakes), and aonori (dried seaweed).
For seafood okonomiyaki, the choice of protein is paramount. Freshness is key to ensuring your pancake tastes vibrant and delicious. Common seafood choices include shrimp, squid, scallops, and even small pieces of white fish or mussels. A mix of two or three types often yields the best results, offering a diverse textural and flavor profile.
When selecting shrimp, opt for medium-sized ones, peeled and deveined. Squid should be cleaned thoroughly and cut into bite-sized rings or strips. Scallops can be left whole if small, or halved if larger. Ensure all seafood is patted dry before mixing into the batter to prevent excess moisture, which can lead to a soggy pancake.
The batter is the foundation of your okonomiyaki. While specialty okonomiyaki flour is available, a good quality all-purpose flour works perfectly well. The secret to a light and airy pancake lies in the dashi. Dashi stock provides a rich umami flavor that is characteristic of Japanese cuisine. Instant dashi granules dissolved in hot water are a convenient option for busy home cooks.
Cabbage is the unsung hero of okonomiyaki, contributing bulk, crunch, and a subtle sweetness. Use a firm green cabbage, finely shredded. The finer the shred, the more evenly it will cook and integrate into the pancake. Aim for approximately 200-250 grams of shredded cabbage per large okonomiyaki, ensuring a vegetable-rich, satisfying meal.
Beyond the core ingredients, several additions elevate the flavor and texture. Tenkasu, or tempura scraps, are essential for adding pockets of crispiness within the soft batter. Benishoga, red pickled ginger, provides a sharp, tangy counterpoint that cuts through the richness of the sauce and mayonnaise. Chopped green onions also add freshness and a mild oniony bite.
Now, let’s talk about the cooking process. A flat griddle or a large, non-stick frying pan is ideal. Heat your cooking surface over medium heat and lightly oil it. The temperature is critical: too low, and the pancake won’t brown; too high, and it will burn on the outside before cooking through on the inside.
Once your batter, seafood, cabbage, tenkasu, and benishoga are gently combined (again, do not overmix!), spoon a generous amount onto the hot griddle. Use your spatula to shape it into a round, relatively thick pancake, about 1.5 to 2 cm high and 15-20 cm in diameter. Avoid pressing down too hard, as this can make the pancake dense.
Cook the first side for about 5-7 minutes. You’ll know it’s ready to flip when the edges firm up, and the bottom is golden brown. A good technique for flipping is to use two spatulas: one to slide under the pancake and another to support the top. Flip it confidently and carefully to prevent it from breaking apart. If you’re new to flipping, a large, wide spatula is your best friend.
After flipping, cook the second side for another 5-7 minutes. To ensure the inside cooks thoroughly, especially with raw seafood, you can cover the pan with a lid for a few minutes. This steams the pancake from the inside, ensuring the cabbage softens and the seafood cooks perfectly without drying out. The total cooking time for each pancake is typically 10-15 minutes.
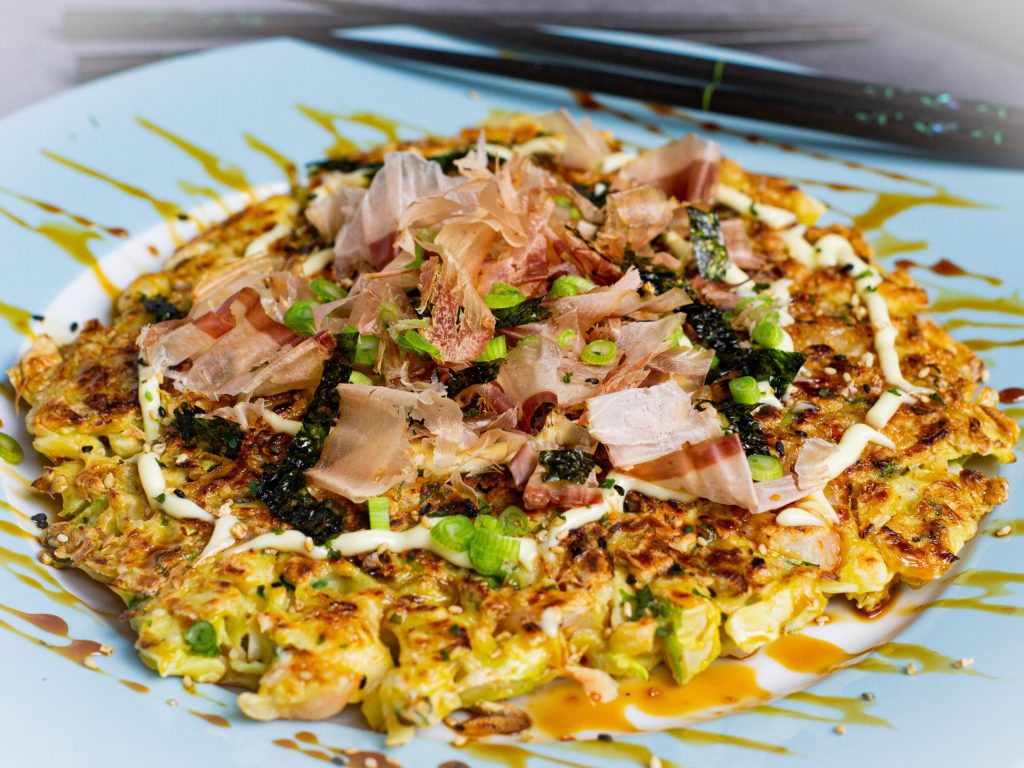
Once cooked, transfer your seafood okonomiyaki to a serving plate. The real artistry begins with the toppings. Start with a generous drizzle of okonomiyaki sauce. This sweet and savory sauce, often likened to a thicker, richer Worcestershire sauce, is the soul of the dish. You can find it in Asian supermarkets, or make a quick version by mixing ketchup, Worcestershire sauce, oyster sauce, and a pinch of sugar.
Next, apply a zig-zag pattern of Japanese mayonnaise. Kewpie mayonnaise, with its richer, tangier, and slightly sweeter flavor profile due to its use of egg yolks only, is highly recommended. It comes in a squeeze bottle, making application easy and fun.
Finally, sprinkle generously with katsuobushi (dried bonito flakes). These thin, smoky flakes will ‘dance’ and curl from the heat of the okonomiyaki, adding a mesmerizing visual and a burst of umami flavor. A final dusting of aonori (dried green laver) provides a distinct oceanic aroma and vibrant color.
For an extra layer of flavor and texture, consider adding a sprinkle of chopped green onions on top, or even a dash of shichimi togarashi (Japanese seven-spice blend) for a subtle kick.
Here are some advanced practical tips to elevate your seafood okonomiyaki:
- Don’t skimp on cabbage: The higher ratio of cabbage to batter is what makes okonomiyaki light and flavorful, not heavy and doughy.
- Rest the batter: As mentioned, resting the batter allows for better hydration and a more tender result. Plan this into your prep time.
- Even heat distribution: Ensure your griddle or pan is evenly heated. Hot spots can lead to uneven cooking.
- Batch cooking: If making multiple okonomiyaki, keep the cooked ones warm in a low oven (around 100°C / 200°F) while you cook the others.
- Listen to the sizzle: A gentle sizzle indicates the right cooking temperature. If it’s too quiet, increase heat; if it’s aggressively loud, reduce it.
Another excellent tip is to prepare all your ingredients (mise en place) before you start cooking. Shred the cabbage, clean and chop the seafood, prepare your batter, and have all your sauces and toppings ready. This streamlined approach makes the cooking process much more enjoyable and less stressful.
If you find your okonomiyaki is falling apart when you try to flip it, it might not have cooked long enough on the first side, or the batter might be too wet. Adding a little more flour to the batter or ensuring your seafood is very dry can help. Conversely, if it’s too dry and dense, you might have used too much flour or overcooked it.
For those who enjoy experimentation, feel free to customize your seafood okonomiyaki. Add different vegetables like thinly sliced mushrooms, corn kernels, or even grated carrots. For a richer flavor, a thin slice of pork belly can be placed on top of the pancake after it’s been poured onto the griddle, cooking on top before being flipped with the pancake.
Consider serving your seafood okonomiyaki with a side of miso soup or a simple Japanese salad with a sesame dressing. It’s a complete meal on its own, but these additions can enhance the dining experience. A cold Japanese beer or sake also pairs wonderfully with the rich flavors of okonomiyaki.
Leftover okonomiyaki can be stored in an airtight container in the refrigerator for up to two days. To reheat, gently warm it in a microwave or a pan over low heat. For best results, avoid crisping it too much during reheating, as it can dry out the cabbage.
Don’t be afraid to adjust the consistency of your batter slightly. If it seems too thick to mix with the cabbage, add a tablespoon or two of dashi or water. If it feels too runny, a small amount of extra flour can be incorporated. The ideal consistency is thick enough to hold its shape but still pourable.
The beauty of okonomiyaki lies in its adaptability. While we focus on seafood, you could easily swap in other proteins like thinly sliced chicken, diced firm tofu, or even just make a vegetarian version packed with various vegetables. The core principles of batter, cabbage, and cooking technique remain the same.
Remember that practice makes perfect. Your first okonomiyaki might not look exactly like those from a Japanese restaurant, but it will undoubtedly be delicious. Each attempt will refine your technique, from achieving the ideal batter consistency to mastering the confident flip.
In conclusion, making practical seafood okonomiyaki at home is a rewarding culinary adventure. By focusing on fresh ingredients, understanding the role of each component, and employing simple cooking techniques, you can bring the vibrant flavors of Japan to your dining table. So gather your ingredients, fire up your griddle, and embark on the delightful journey of crafting your perfect savory pancake.
Embrace the ‘as you like it’ philosophy, experiment with your favorite seafood and toppings, and savor the unique blend of textures and tastes. Seafood okonomiyaki is more than just a meal; it’s an experience that celebrates comfort, creativity, and the joy of home cooking. Enjoy your culinary creation!