Among these innovative variations, the seafood samosa stands out as a luxurious and tantalizing option. It introduces a delightful oceanic dimension to the classic pastry, offering a lighter yet equally satisfying experience. Imagine the delicate flakiness of the samosa wrapper giving way to a rich, aromatic filling brimming with succulent pieces of prawns, flaky fish, or tender squid, all infused with a symphony of Indian spices.
Our focus today is on the ‘Pedas India’ style – signifying a distinctly spicy Indian preparation. This isn’t just about heat; it’s about a complex interplay of spices that build warmth and depth, complementing the natural sweetness of the seafood without overpowering it. The ‘pedas’ (spicy) element is carefully balanced, designed to tantalize the taste buds and leave a memorable impression, making this seafood samosa an unforgettable culinary delight.
Crafting the perfect Pedas India Seafood Samosa is an art form, a journey that combines precise technique with an intuitive understanding of flavors. This comprehensive guide aims to demystify the process, providing you with all the knowledge and tips required to create samosas that are not only authentic in taste but also impeccable in presentation. From the foundational dough to the intricate spice blend for the filling, every step is crucial in achieving that coveted golden-brown crispness and intensely aromatic interior.
Preparing these samosas from scratch offers immense satisfaction and allows for complete control over the quality of ingredients and the intensity of flavors. While store-bought wrappers can be an option for convenience, making your own dough ensures that authentic flaky texture and robust structure that truly elevates the samosa experience. Let’s delve into the essential components that make this recipe truly special.
The Foundation: Crafting the Perfect Samosa Dough
The dough is the backbone of any great samosa. It needs to be sturdy enough to hold the filling without tearing, yet delicate enough to achieve that signature crisp, flaky texture when cooked. The secret lies in the right balance of ingredients and proper kneading.
- 2 cups (250g) All-purpose flour (Maida)
- 1/4 teaspoon Salt
- 1/4 cup (60ml) Ghee or vegetable oil (for richness and flakiness)
- 1/2 cup (120ml) Cold water (approximately, adjust as needed)
The use of ghee (clarified butter) or oil is critical here. It’s rubbed into the flour, creating tiny pockets of fat that expand during cooking, resulting in a delightfully flaky crust. Cold water helps in developing a firm, pliable dough that is easy to work with and prevents over-development of gluten, which could lead to a tough samosa.
- In a large mixing bowl, combine the all-purpose flour and salt.
- Add the ghee or oil to the flour mixture. Using your fingertips, rub the fat into the flour until the mixture resembles coarse breadcrumbs. This step, known as ‘moyan’ in Indian cooking, is vital for flakiness.
- Gradually add cold water, a tablespoon at a time, and knead until a firm, smooth, and pliable dough forms. The dough should be stiff, not soft or sticky. Avoid adding too much water.
- Cover the dough with a damp cloth and let it rest for at least 30 minutes. This resting period allows the gluten to relax, making the dough easier to roll and preventing it from shrinking back.
The Heart of the Samosa: The Spicy Seafood Filling
Now for the star of the show – the filling. This is where the ‘Pedas India’ magic truly happens, with a vibrant blend of fresh seafood and aromatic spices creating an explosion of flavor.
Choosing Your Seafood: For an authentic and delicious experience, opt for fresh, high-quality seafood. A mix often works best for a varied texture and flavor profile.
- Prawns (Shrimp): Medium-sized, deveined, and finely chopped. Their natural sweetness pairs beautifully with spices.
- White Fish: Firm, flaky white fish like cod, snapper, or basa, flaked or finely diced.
- Squid (Calamari): Tenderized and finely chopped for a unique texture.
Ensure the seafood is thoroughly cleaned, drained, and patted dry before chopping. Excess moisture can make the filling soggy and difficult to work with.
- 1 tablespoon Vegetable oil
- 1 large Onion, finely chopped
- 1 tablespoon Ginger-garlic paste
- 2-3 Green chilies, finely chopped (adjust to your spice preference)
- 1/2 cup Mixed seafood (prawns, fish, squid), finely chopped
- 1/2 teaspoon Turmeric powder
- 1 teaspoon Red chili powder (Kashmiri for color, or regular for more heat)
- 1 tablespoon Coriander powder
- 1/2 teaspoon Cumin powder
- 1/2 teaspoon Garam masala
- 1/4 teaspoon Black pepper powder
- 1/2 teaspoon Amchur (dry mango powder) or juice of 1/2 lemon
- 2 tablespoons Fresh coriander leaves, chopped
- Salt to taste
- Heat oil in a pan over medium heat. Add the finely chopped onions and sauté until translucent and lightly golden.
- Add the ginger-garlic paste and chopped green chilies. Sauté for another minute until fragrant, ensuring the raw smell disappears.
- Introduce all the dry spices: turmeric powder, red chili powder, coriander powder, cumin powder, garam masala, and black pepper powder. Cook the spices for 1-2 minutes on low heat, stirring continuously, until their aroma is released. Add a splash of water if the spices start to stick.
- Add the finely chopped mixed seafood to the pan. Cook for 3-5 minutes, stirring gently, until the seafood is just cooked through. Be careful not to overcook, as seafood can become rubbery.
- Stir in the amchur powder or lemon juice and fresh coriander leaves. Mix well and check for seasoning, adjusting salt if necessary.
- Remove the filling from heat and allow it to cool completely. It is crucial that the filling is cold before you start assembling the samosas; warm filling can make the dough soggy and difficult to seal.
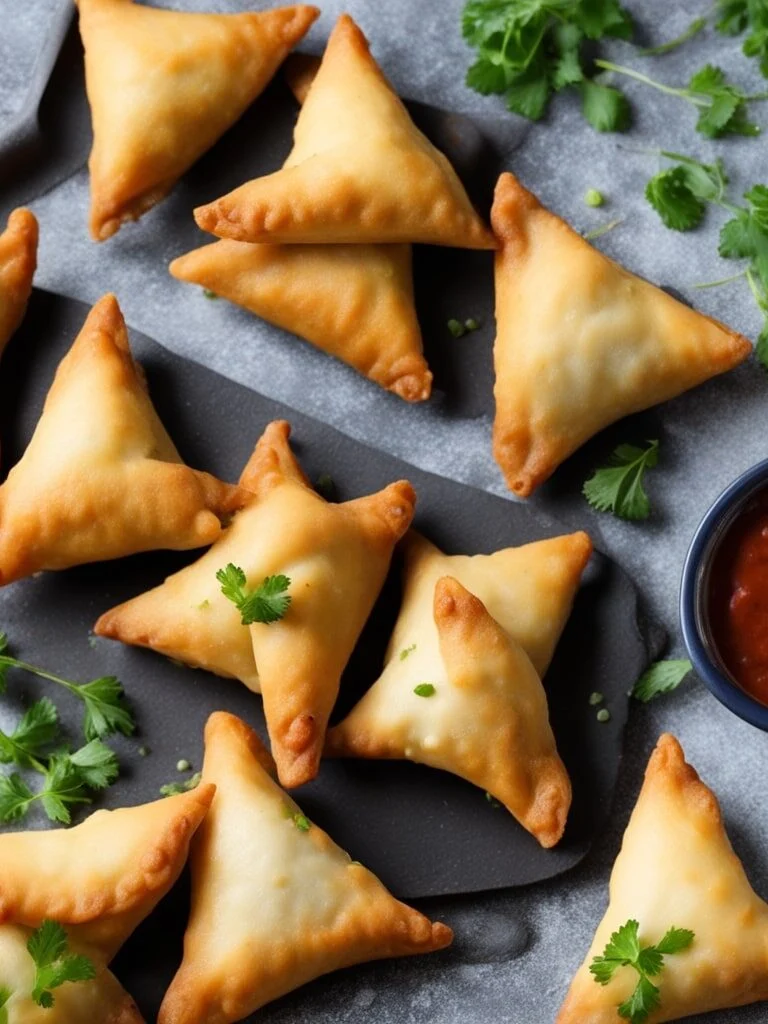
The Art of Samosa Folding: Crafting the Perfect Triangle
Folding a samosa is often considered the most challenging part, but with a little practice, it becomes intuitive. The goal is to create a neat, sealed triangular pocket that holds the filling securely and fries evenly.
- Divide the rested dough into equal small balls, about the size of a golf ball.
- On a lightly floured surface, roll each ball into an oval shape, approximately 5-6 inches long and 3-4 inches wide, about 1/8 inch thick. The dough should be neither too thin (prone to tearing) nor too thick (resulting in a chewy crust).
- Cut each oval in half lengthwise, creating two semi-circles.
- Take one semi-circle. Lightly moisten the straight edge with water (this acts as glue). Bring the two ends of the straight edge together, overlapping them slightly to form a cone shape. Press firmly to seal the seam, ensuring there are no gaps.
- Hold the cone in one hand and carefully spoon about 1-2 tablespoons of the cooled seafood filling into it. Do not overfill, as this makes sealing difficult and can cause bursting during frying.
- Moisten the open edges of the cone with water. Gently press the edges together to form a triangular shape, sealing all sides completely. You can create a small pleat on one side to help achieve the classic samosa shape. Ensure the seal is tight to prevent the filling from escaping during cooking.
- Repeat the process with the remaining dough and filling. Place the prepared samosas on a baking sheet lined with parchment paper, ensuring they don’t touch each other.
Cooking Methods: Achieving Golden Perfection
While deep-frying is the traditional method, offering an unparalleled crispness, there are healthier alternatives that still yield delicious results.
- Heat vegetable oil in a deep pan or kadai over medium-low heat. The oil temperature is crucial; it should be around 300-325°F (150-160°C). If the oil is too hot, the samosas will brown too quickly on the outside and remain raw inside. If it’s too cool, they will absorb too much oil and become greasy.
- Carefully slide a few samosas into the hot oil, ensuring not to overcrowd the pan. Fry in batches.
- Fry the samosas, turning occasionally, until they are golden brown and crispy on all sides. This usually takes about 8-12 minutes per batch, depending on the heat and size of the samosas.
- Once cooked, remove the samosas with a slotted spoon and place them on a wire rack lined with paper towels to drain excess oil.
- Preheat your oven to 400°F (200°C).
- Lightly brush the prepared samosas with oil or melted ghee on all sides. This helps in achieving a golden color and some crispness.
- Arrange the samosas in a single layer on a baking sheet lined with parchment paper.
- Bake for 20-25 minutes, flipping them halfway through, until they are golden brown and crisp. Keep an eye on them to prevent burning.
- Preheat your air fryer to 375°F (190°C).
- Lightly brush the samosas with oil.
- Place a single layer of samosas in the air fryer basket, ensuring not to overcrowd.
- Air fry for 12-15 minutes, flipping halfway, until golden brown and crispy.
Serving Suggestions and Accompaniments
Samosas are best enjoyed hot, straight from the fryer or oven. They are rarely served alone, as their rich flavors are beautifully complemented by an array of chutneys and dips.
- Mint-Coriander Chutney: A refreshing, vibrant green chutney made with fresh mint, coriander, green chilies, and a hint of lemon. Its coolness perfectly balances the spice of the samosas.
- Tamarind Chutney (Imli Chutney): A sweet and tangy brown chutney made from tamarind pulp, jaggery, and spices. It offers a delightful contrast to the savory filling.
- Green Chili Chutney: For those who crave extra heat, a fiery green chili chutney can elevate the ‘pedas’ experience even further.
- Yogurt Dip: A simple, cooling yogurt dip, perhaps seasoned with a pinch of roasted cumin powder, can also be a wonderful accompaniment.
Garnish with a sprinkle of fresh coriander leaves and serve with lemon wedges for an added burst of freshness. These samosas make an excellent appetizer for parties, a sophisticated snack with evening tea, or even a light meal.
Tips for Samosa Success: Mastering the Art
Even with a detailed recipe, a few expert tips can make all the difference in achieving samosa perfection.
Dough Consistency is Key: The dough must be firm and stiff. A soft dough will be difficult to roll and fold, and it will absorb more oil during frying, resulting in a greasy samosa. If your dough feels too soft, add a little more flour, a tablespoon at a time, until the desired consistency is reached.
Moisture Control in Filling: Ensure your seafood filling is completely dry and cooled before filling the samosas. Any excess moisture will make the dough soggy, cause it to tear, and potentially lead to the samosas bursting during frying. If your filling seems too wet, you can briefly cook it down further or add a spoonful of roasted gram flour (besan) to absorb moisture.
Perfect Sealing: A well-sealed samosa is crucial. Use water sparingly but effectively to create a strong seal. Press firmly along all edges to prevent the filling from leaking out during cooking, which can also cause oil splattering and a messy cooking experience.
Oil Temperature Management: This is perhaps the most critical aspect of frying. Start with medium-low heat. If the oil is too hot, the samosas will brown quickly on the outside, leaving the dough raw and uncooked inside. If the oil is too cold, the samosas will soak up too much oil, becoming greasy and heavy. Fry in small batches to maintain a consistent oil temperature.
Resting the Dough: Do not skip the resting period for the dough. This allows the gluten to relax, making the dough more pliable and easier to roll without shrinking back. It also contributes to the desired flaky texture.
Variations and Customizations: Your Culinary Canvas
The beauty of this recipe lies in its adaptability. Feel free to experiment and tailor it to your personal preferences.
Adjusting Spice Levels: The ‘Pedas India’ aspect can be intensified or mellowed. For more heat, increase the quantity of green chilies and red chili powder. For a milder version, reduce these and focus more on aromatic spices like coriander and cumin.
Seafood Combinations: Explore different combinations of seafood. Scallops, crab meat, or even smoked fish can introduce unique flavors. Just ensure they are finely chopped and cooked quickly to retain tenderness.
Adding Vegetables: While pure seafood is delightful, you can add a small amount of finely diced potatoes, peas, or corn to the filling for added texture and volume. Ensure any added vegetables are pre-cooked to avoid releasing moisture during frying.
Alternative Flours: For a slightly different texture, you can experiment with a small percentage of whole wheat flour blended with all-purpose flour, though this might result in a slightly denser crust.
Storage and Reheating: Enjoying Samosas Later
Samosas are best fresh, but they can be prepared in advance or stored for later enjoyment.
Freezing Uncooked Samosas: Place uncooked, un-fried samosas on a baking sheet and freeze until solid. Once frozen, transfer them to an airtight freezer bag. They can be stored for up to 2-3 months. When ready to cook, fry or bake directly from frozen, adding a few extra minutes to the cooking time.
Storing Cooked Samosas: Cooked samosas can be stored in an airtight container in the refrigerator for 2-3 days. They tend to lose their crispness over time.
Reheating Cooked Samosas: To restore crispness, reheat cooked samosas in a preheated oven at 350°F (175°C) for 10-15 minutes, or in an air fryer for 5-7 minutes. Avoid using a microwave, as it will make them soggy.
The Cultural Significance of Samosas: More Than Just a Snack
Beyond their delicious taste, samosas hold a significant place in Indian culture. They are often shared during celebrations, festivals, and family gatherings, symbolizing hospitality and warmth. The act of making samosas from scratch is a labor of love, a culinary tradition passed down through generations, connecting people to their heritage and to each other.
The Pedas India Seafood Samosa is a testament to the dynamic and evolving nature of Indian cuisine. It honors traditional flavors and techniques while embracing contemporary tastes and ingredients. This recipe not only promises a delectable snack but also offers a rewarding culinary journey, allowing you to explore the rich tapestry of Indian spices and the delicate flavors of the ocean.
In conclusion, mastering the art of the Spicy Indian Seafood Samosa is a truly gratifying experience. With attention to detail in dough preparation, a vibrant and well-balanced seafood filling, and careful folding and cooking techniques, you can recreate this exquisite delicacy in your own kitchen. Prepare to impress your family and friends with these golden, crispy, and intensely flavorful pockets of joy, a true celebration of Indian culinary artistry.