The journey to the perfect seafood croquette begins not at the fryer, but with the structural integrity of the filling. Unlike potato-based croquettes which rely on starch for stability, a gourmet seafood croquette often relies on a thick, savory béchamel sauce (ragout) as the binder. This requires a meticulous approach to making a roux, ensuring that the mixture is thick enough to hold its shape when cold, yet melts into a creamy delight when heated.
Selecting the Best Seafood
The quality of your protein defines the flavor profile of the croquette. While you can use a variety of seafood, a combination of shrimp and crab meat offers the most sophisticated taste. Shrimp provides a firm, pleasant bite, while crab meat offers a delicate sweetness that permeates the béchamel. If you are on a budget or prefer a milder taste, firm white fish like cod or pollock is an excellent substitute. Avoid oily fish like mackerel or salmon, as their strong flavors can overpower the delicate creaminess of the base.
Preparation of the seafood is equally critical. The seafood should be pre-cooked—either steamed or sautéed lightly—before being added to the mixture. It is vital to drain any excess liquid from the cooked seafood. Excess moisture is the enemy of a croquette; it prevents the filling from setting properly and can cause the croquette to burst during the frying process due to steam expansion.
The Foundation: Mastering the Béchamel
The binder for your seafood is a heavy béchamel sauce. To start, you must create a roux by cooking equal parts unsalted butter and all-purpose flour. Cook the roux over medium heat for several minutes to remove the raw flour taste, but do not let it brown too deeply, as you want a white or blonde roux to maintain an appetizing color inside the croquette.
Flavor Infusion and Aromatics
A plain béchamel can be bland, so seasoning is paramount. Traditional aromatics include finely diced onions and celery, sautéed in butter until translucent before being added to the sauce. For the seasoning profile, salt and white pepper are standard. White pepper is preferred over black pepper for aesthetic reasons, keeping the filling looking pristine.
For a professional touch, add a pinch of nutmeg. Nutmeg has a natural affinity with dairy and seafood, bridging the gap between the rich milk solids and the savory ocean flavors. Some chefs also incorporate a small amount of Dijon mustard or a splash of dry sherry to cut through the richness and add complexity.
The Cooling Phase: Patience is a Virtue
One of the most common mistakes home cooks make is attempting to shape the croquettes while the mixture is still warm. This is physically impossible and will result in a mess. Once the seafood and sauce are combined, spread the mixture onto a wide, shallow baking sheet. Cover it with plastic wrap, pressing the wrap directly onto the surface of the mixture to prevent a skin from forming.
Refrigerate the mixture for a minimum of four hours, though overnight is ideal. During this time, the butter and flour in the béchamel solidify, turning the soft sauce into a firm, malleable block. This step is non-negotiable if you want uniform, easy-to-handle croquettes.
Shaping and Consistency
Once the filling is thoroughly chilled, it is time to shape. Use a mechanical ice cream scoop or a scale to ensure every croquette is the same size. Uniformity is not just about presentation; it ensures that all croquettes cook at the same rate. Standard shapes are cylinders (logs) or thick discs. Cylinders are traditional for creamy croquettes as they heat through evenly.
When handling the mixture, work quickly. The heat from your hands will begin to soften the butter in the béchamel. If the mixture becomes too sticky, dust your hands lightly with flour or return the mixture to the refrigerator for 15 minutes.
The Breading Station: The Secret to ‘Renyah’
The crispy exterior is achieved through a standard three-stage breading process: flour, egg wash, and breadcrumbs. However, for seafood croquettes, the type of breadcrumb matters immensely. Panko (Japanese-style breadcrumbs) is superior to fine, sandy breadcrumbs. Panko flakes are larger and airier, absorbing less oil and creating a much crunchier texture.
Set up your station: one bowl for all-purpose flour seasoned with a pinch of salt; a second bowl for beaten eggs (add a splash of water or milk to thin the eggs slightly for a more even coat); and a third bowl for the Panko.
Use the ‘wet hand, dry hand’ method to keep your fingers from becoming breaded. Roll the shaped croquette in flour, shaking off absolutely all excess. Too much flour creates a barrier that prevents the egg from sticking, leading to the breading peeling off during frying. Dip in egg, ensure full coverage, and then press firmly into the Panko.
The Double-Breading Technique
For an ultra-crispy crust and added structural security against bursting, consider double-breading. After the first coat of Panko, dip the croquette back into the egg wash and into the Panko a second time. This creates a thicker, more robust shell that acts as an armor for the delicate cream filling. This is highly recommended if your filling is particularly soft.
Resting Before Frying
After breading, do not throw the croquettes immediately into the fryer. Place them on a wire rack and refrigerate them for another 30 minutes. This allows the gluten in the breading to relax and the egg to dry slightly, adhering the crumbs firmly to the croquette. This step significantly reduces the amount of crumbs that fall off in the oil, keeping your frying oil cleaner for longer.
Frying: Temperature Control
The frying stage is where the magic happens. You need a neutral oil with a high smoke point, such as canola, vegetable, or peanut oil. Fill a heavy-bottomed pot or a deep fryer with enough oil to fully submerge the croquettes. Deep frying is preferable to shallow frying for this dish, as it ensures even coloring without the need to flip the delicate rolls constantly.
Heat the oil to exactly 170°C to 180°C (340°F – 355°F). If the oil is too cool, the breadcrumbs will act like a sponge, soaking up grease and resulting in a soggy, heavy product. If the oil is too hot, the outside will burn before the heat penetrates the center.
Managing the Fryer
Fry in small batches. Overcrowding the pan causes the oil temperature to drop precipitously. If the temperature drops below 160°C, the croquettes will not sear properly and may burst. A burst croquette is a disaster in a deep fryer, as the water content from the filling hits the hot oil, causing dangerous splattering.
Fry until the croquettes are a deep golden brown, usually taking about 3 to 4 minutes depending on size. Listen to the sound of the frying; often, the sizzling sound changes pitch when the moisture on the surface has evaporated, indicating crispness.
Draining and Serving
Once removed from the oil, never place fried foods directly onto paper towels. Paper towels trap steam between the food and the paper, causing the bottom of the croquette to turn soggy instantly. Instead, place the fried croquettes on a wire rack set over a baking sheet. This allows air to circulate around the entire item, preserving that hard-earned crispiness.
Sauce Pairings
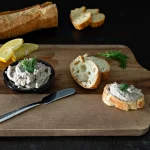
While seafood croquettes are delicious on their own, the right sauce elevates the dish. A classic Tartar sauce—mayonnaise, capers, pickles, lemon juice, and fresh dill—is the traditional accompaniment. The acidity of the pickles and lemon cuts through the richness of the deep-fried béchamel.
For a spicy kick, an Aioli mixed with Sriracha or a chili-garlic paste works wonders. In Japan, these are often served with ‘Tonkatsu sauce,’ a thick, sweet-and-savory Worcestershire-style sauce that complements the Panko crust beautifully.
Common Troubleshooting: Why Did They Burst?
If your croquettes explode in the fryer, it is usually due to one of three reasons: the filling was too wet (not reduced enough), there were air pockets trapped during shaping, or the oil temperature was too low. Ensure you pack the croquettes tightly to remove air and maintain high heat.
Storage and Reheating
Seafood croquettes are best eaten fresh. However, if you have leftovers, do not microwave them. Microwaving destroys the crispy texture, turning the Panko into a soft mush. To reheat, place them in an oven or an air fryer at 180°C (355°F) for about 10 minutes until heated through and crispy again.
Freezing for Later
This recipe is excellent for meal prep. You can freeze the uncooked, breaded croquettes. Arrange them in a single layer on a baking sheet to freeze individually, then transfer them to a freezer bag. When ready to eat, you can fry them directly from frozen—simply lower the oil temperature slightly to 160°C and fry for a few minutes longer to ensure the center thaws and cooks without burning the exterior.
Conclusion
Mastering the art of ‘Cara Memasak Seafood Croquettes Renyah’ is a rewarding challenge. It teaches the fundamental skills of sauce making, temperature control, and breading that are applicable to countless other dishes. The result—a golden, crunchy cylinder filled with creamy, oceanic goodness—is a testament to the effort put into the process. Whether served as an elegant appetizer at a dinner party or a comforting snack, these croquettes are sure to impress.