The habitat of the blood clam contributes significantly to this cleaning challenge. These bivalves thrive in the shallow, muddy intertidal zones of estuaries and bays. Because they are filter feeders living in silt-heavy environments, they naturally accumulate sediment inside their mantle cavity. If not cleaned with meticulous care, a delicious seafood dinner can quickly turn into a gritty, unpleasant experience that risks damaging your teeth and ruining your appetite.
Beyond the texture, hygiene is a paramount concern when preparing Kerang Dara. Because they filter water to feed, they can accumulate bacteria and viruses, including Hepatitis A and typhoid, if harvested from polluted waters. Therefore, the cleaning process is not just about removing sand; it is a critical food safety protocol. This comprehensive guide will walk you through the professional steps to ensure your blood clams are bersih tuntas—thoroughly clean—and safe for consumption.
Step 1: Selecting the Freshest Clams
The cleaning process actually begins at the market. Selecting high-quality, live clams makes the cleaning process significantly easier and safer. When purchasing Kerang Dara, look for shells that are tightly closed. If a shell is slightly open, tap it gently; a live clam will snap its shell shut immediately. If it remains open, the clam is dead and should be discarded immediately, as rapid bacterial decomposition makes them unsafe to eat.
Inspect the shells for damage. Avoid clams with cracked or broken shells, as these are likely dead or contaminated. Furthermore, use your sense of smell. Fresh blood clams should smell like the ocean—salty and briny. Any hint of ammonia or a sulfurous ‘rotten egg’ odor indicates spoilage. Finally, choose clams that feel heavy for their size, indicating they are full of meat and water, rather than being dried out.
Step 2: The Initial Rinse
Once you have brought your fresh catch home, the first step is a vigorous initial rinse. Place the clams in a large colander or basin and run cold tap water over them. Use your hands to tumble the clams around, washing away the exterior layers of thick mud and debris. Do not be afraid to be somewhat rough during this stage; the shells are thick and durable.
Repeat this rinsing process multiple times until the water runs relatively clear. You are not trying to get them perfectly clean yet; you are simply removing the bulk of the external muck so that the soaking water in the next step remains effective. Discard any clams that float during this process or those that have opened and do not close when handled.
Step 3: The Soaking Strategy (The Sand Expulsion Phase)
This is the most critical phase of cleaning Kerang Dara. To get the clams to expel the sand and mud trapped inside their digestive tracts, you must trick them into filtering water. There are several methods used by chefs and home cooks, and often a combination yields the best results.
Method A: The Saltwater Mimicry
The most scientifically sound method is to replicate the clam’s natural environment. Dissolve a generous amount of sea salt in a bowl of cool water. The water should taste as salty as the sea (approximately 3% salinity). Submerge the clams in this solution and leave them in a dark, cool place for at least 1 to 2 hours. The darkness encourages them to extend their siphons and filter the water, spitting out sand in the process.
Method B: The Chili Trick
A popular traditional method in Indonesia involves adding spicy elements to the soaking water. Crush several red chili peppers (cabe merah) or bird’s eye chilies and add them to the water. The theory is that the capsaicin acts as an irritant to the clams, causing them to purge their systems more vigorously to expel the spicy water. While anecdotal, many cooks swear by this method for speeding up the process.
Method C: The Metal Spoon Technique
Another fascinating kitchen hack involves placing metal utensils, such as stainless steel spoons or a knife, into the soaking bowl. The interaction between the metal and the slightly acidic or saline water is believed to create a subtle chemical reaction or frequency that clams dislike, prompting them to open up and release sediment. While less scientifically proven than the saltwater method, it is a harmless addition that can be combined with salt soaking.
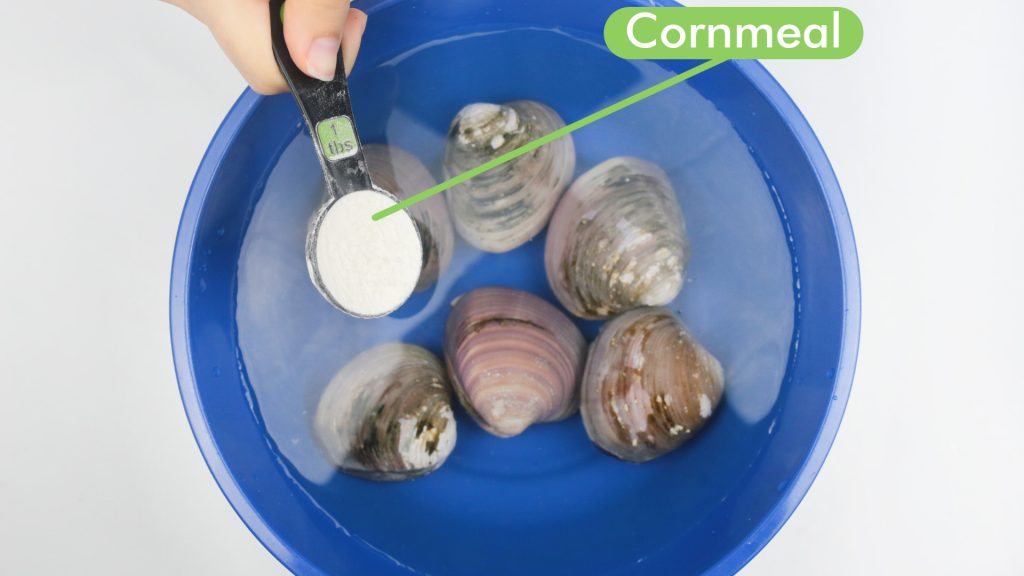
Method D: The Flour/Cornstarch Method
Some chefs add a tablespoon of flour or cornstarch to the water. The clams, being filter feeders, will ingest the flour water and spit out the sand and grit in exchange. This method also helps to whiten the meat slightly and can be very effective when combined with salt.
Step 4: Mechanical Scrubbing
After the clams have soaked for several hours, carefully lift them out of the water. Do not pour the water out with the clams in it, as the sand will have settled at the bottom of the bowl and you risk re-contaminating them. Lift them out by hand or with a spider strainer.
Now comes the labor-intensive part: scrubbing. Even after rinsing and soaking, the ridged shells of Kerang Dara often hold stubborn algae, barnacles, and dirt. Using a stiff kitchen brush or a dedicated seafood brush, scrub each clam individually under running water. Pay close attention to the hinge area where mud tends to cake.
If you are cleaning a very large batch and individual scrubbing is not feasible, you can use the ‘tumble’ method. Place the clams in a sturdy pot with a small amount of water, cover with a lid, and shake the pot vigorously. The friction of the shells rubbing against each other acts as a natural abrasive cleaner. Rinse and repeat until the shells are spotless.
Step 5: Final Purification and Parboiling
Even with thorough soaking and scrubbing, professional safety standards suggest a parboiling step, especially if the clams will be used in a stir-fry or salad. Bring a pot of water to a rolling boil. You can add aromatics like crushed ginger, lemongrass, or salam leaves (Indonesian bay leaves) to the water to neutralize any fishy odors.
Submerge the cleaned clams in the boiling water. This step serves two purposes: it kills surface bacteria and helps to slightly open the shells, making shucking easier. Do not fully cook them at this stage if you plan to cook them further in a sauce. Blanch them for only 1 to 2 minutes until the shells just begin to crack open.
Immediately transfer the clams to an ice-water bath. This ‘shocking’ process stops the cooking immediately, preventing the meat from becoming rubbery and tough—a common issue with overcooked blood clams. The meat should remain tender and juicy.
Step 6: Shucking (Optional)
Depending on your recipe, you may need to remove the meat from the shells entirely. If you have parboiled them, the shells should be slightly open. Insert a dull butter knife or a dedicated clam shucker into the gap and twist gently to pry the shell open. Run the knife along the top shell to detach the muscle, then scoop the meat out.
If you are serving them in the shell, you can skip the full shucking. However, it is courteous to your diners to pry the shells open slightly so they do not have to struggle with them at the table. Discard any clams that remained tightly shut even after boiling, as these were likely dead before cooking.
Cooking Tips for Texture
The hallmark of excellent Kerang Dara is its texture. Overcooking is the enemy. Blood clams contain hemoglobin (which gives them their red color and name), and like a steak, they become tough and dry if cooked well-done. They are best enjoyed when the meat is still plump and slightly glistening.
If you are making Sambal Kerang, prepare your sauce separately until it is fully cooked and thickened. Toss the parboiled clams into the sauce only at the very last minute, just long enough to heat them through and coat them in the spices. This preserves the delicate sweetness of the clam meat against the fiery backdrop of the chili paste.
Storage and Safety
Ideally, blood clams should be cooked the day they are bought. They are highly perishable. If you must store them, keep them alive in the refrigerator in a bowl covered with a damp cloth. Do not store them in water in the fridge, as they will suffocate, and do not seal them in an airtight container.
If you have already cooked and shucked the meat, it can be frozen, though the texture will change slightly upon thawing. Freeze the meat in a sealed bag with a little bit of the cooking broth to prevent freezer burn.
Conclusion
Cleaning Kerang Dara is undeniably a labor of love. It requires patience, attention to detail, and a commitment to hygiene. However, the reward is a seafood experience that is texturally superior and flavorfully pure. By following this guide—selecting wisely, soaking strategically with salt and chilies, scrubbing diligently, and cooking with precision—you ensure that every bite is savory, sweet, and completely free of grit.
Mastering the preparation of blood clams opens the door to authentic Southeast Asian culinary adventures. Whether you are grilling them with lime and cilantro, stir-frying them with pad thai noodles, or simmering them in a rich coconut curry, the confidence of knowing your ingredients are bersih tuntas allows you and your guests to dine with pleasure and peace of mind.
: A Masterclass in Seafood Preparation")