Pan-seared clams offer a unique combination of textures and flavors. The slightly briny, sweet taste of the clam is enhanced by the Maillard reaction, a chemical process that creates a delicious brown crust on the outside. This contrast between the tender interior and the crispy exterior is what makes pan-seared clams so irresistible. Plus, they’re relatively quick and easy to prepare, making them a fantastic option for a weeknight dinner or a special occasion appetizer.
Before you even think about firing up the stove, the most critical step is selecting the freshest clams. This is not just about taste; it’s about safety. Clams are filter feeders, meaning they draw water through their bodies and filter out nutrients. This also means they can accumulate toxins or bacteria if harvested from contaminated waters. Therefore, sourcing your clams from a reputable fishmonger or seafood market is paramount.
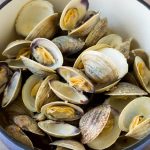
Look for clams that are tightly closed. Any open clams should be gently tapped; if they don’t close, discard them. They’re likely dead. The shells should be clean and free of cracks. A fresh, slightly salty aroma is a good sign, while a fishy or ammonia-like smell indicates the clams are not fresh. Different types of clams, like littleneck, cherrystone, or Manila, can be used, each bringing its own subtle flavor variations.
Once you have your fresh clams, the next step is cleaning them. This is crucial for removing any sand or grit that might ruin your dining experience. The easiest way to clean clams is under cold running water. Hold each clam under the water and scrub the shell with a stiff brush. Pay particular attention to the hinge area where sand tends to accumulate.
Some people recommend soaking clams in cold saltwater for a short period to help them purge any remaining sand. To do this, combine cold water with a generous amount of sea salt, mimicking the salinity of their natural environment. Place the clams in the saltwater and let them sit for about 20-30 minutes. After soaking, rinse the clams again under cold water.
Now that your clams are cleaned, it’s time to prepare them for searing. You’ll need a heavy-bottomed pan, like a cast-iron skillet, which distributes heat evenly and retains it well. This is essential for achieving a good sear. Choose a pan that’s large enough to hold the clams in a single layer, or work in batches to avoid overcrowding.
Heat your pan over medium-high heat. The pan should be hot enough to sear the clams quickly without overcooking them. Add a generous amount of high-heat cooking oil, such as avocado oil, grapeseed oil, or a blend of olive oil and butter. The butter adds flavor, but it can burn easily, so be mindful of the heat.
Once the oil is shimmering, it’s time to add the clams. Place the clams in the hot pan, shell-side down. Don’t overcrowd the pan; you want each clam to have direct contact with the hot surface. If you’re using a large quantity of clams, you may need to sear them in batches.
Let the clams sear undisturbed for about 2-3 minutes. You should start to see the shells open slightly. This is a sign that they’re cooking. Don’t be tempted to move the clams around too much; you want them to develop a nice sear. The goal is to get a golden-brown crust.
After the initial searing, you can add flavorings to the pan. This is where you can get creative! Garlic, shallots, herbs like thyme or rosemary, a splash of white wine, or a knob of butter can all elevate the dish. Be careful not to add too much at once, as you don’t want to cool down the pan significantly.
If you’re using wine, deglaze the pan by pouring the wine in and scraping up any browned bits from the bottom. This adds incredible flavor to the sauce. Let the wine simmer for a minute or two to reduce slightly. If you’re using butter, add it at the end to prevent it from burning.
Continue to cook the clams until they’ve all opened. Discard any clams that don’t open after a few minutes, as they are not safe to eat. The cooking time will vary depending on the size of the clams and the heat of your pan, but it usually takes around 5-7 minutes total.
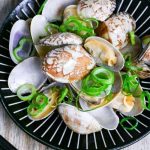
Once the clams have opened, they’re ready to be served! Use tongs to transfer the clams to a serving plate. Pour the flavorful pan sauce over the clams. Garnish with fresh herbs, a squeeze of lemon juice, or a sprinkle of red pepper flakes for an extra touch of flavor and visual appeal.
Classic Garlic and White Wine: Sauté minced garlic and shallots in olive oil, deglaze with white wine, and add a knob of butter at the end.
Spicy Tomato and Chorizo: Sauté diced chorizo, add crushed tomatoes, and a pinch of red pepper flakes. Cook until the sauce thickens slightly.
Lemon Herb: Sauté garlic and fresh herbs like thyme and parsley in butter. Finish with a squeeze of lemon juice.
Coconut Curry: Sauté ginger, garlic, and red curry paste. Add coconut milk and let it simmer before adding the clams.
Pan-seared clams are a versatile dish that can be served in many ways. They make a fantastic appetizer, served with crusty bread for dipping into the flavorful sauce. They can also be a main course, served with pasta, rice, or simply alongside a fresh salad.
Appetizer: Serve with crusty bread and a side of lemon wedges.
Main Course with Pasta: Toss cooked pasta (like linguine or spaghetti) with the pan sauce and clams.
Main Course with Rice: Serve over steamed rice, drizzled with the pan sauce.
Salad Topper: Add pan-seared clams to a fresh salad for a protein-packed meal.
Overcrowding the Pan: This will lower the pan’s temperature and prevent the clams from searing properly. Work in batches if necessary.
Overcooking the Clams: Clams cook quickly, so it’s essential to monitor them closely. Overcooked clams will be tough and rubbery.
Not Cleaning the Clams Thoroughly: This can lead to a gritty dining experience. Take the time to clean the clams properly.
Using the Wrong Pan: A heavy-bottomed pan is crucial for even heat distribution and a good sear.
Using Too Much Oil: While you need enough oil to sear the clams, too much can make the dish greasy.
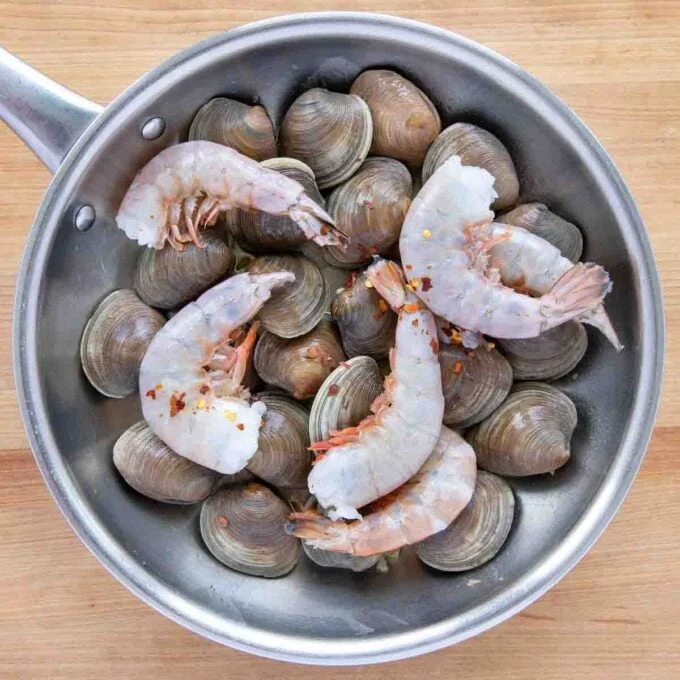
Once you master the basic pan-searing technique, you can experiment with different types of clams and flavor combinations. Try using different herbs, spices, and wines to create your signature dish. Consider adding other seafood, like shrimp or mussels, to the pan for a more complex flavor profile.
Remember to always prioritize food safety. Discard any clams that don’t open during cooking, and only eat clams that have been properly cooked. Enjoy the process of creating this delicious and satisfying dish!
2 pounds fresh clams (littleneck, cherrystone, or Manila)
2 tablespoons olive oil
2 cloves garlic, minced
1/4 cup dry white wine
2 tablespoons butter
Fresh parsley, chopped, for garnish
Lemon wedges, for serving
-
Clean the clams thoroughly.
-
Heat olive oil in a heavy-bottomed pan over medium-high heat.
-
Add the clams and sear for 2-3 minutes, undisturbed.
-
Add garlic and cook for 30 seconds until fragrant.
-
Deglaze with white wine and let it simmer for 1 minute.
-
Add butter and cook until the clams open (about 5-7 minutes). Discard any unopened clams.
-
Garnish with parsley and serve with lemon wedges.
Pan-seared clams are a testament to the idea that simple ingredients, when prepared with care and attention, can create a truly memorable meal. With these techniques and tips, you’re well on your way to becoming a clam-searing expert. Enjoy the journey, and savor every delicious bite!
Beyond the basic pan-searing technique, there are several advanced techniques and considerations that can elevate your clam dishes even further.
Smoking the Clams: Before pan-searing, you can lightly smoke the clams for a smoky flavor. Use a smoker or a stovetop smoker. Smoke the clams for a short period, just enough to impart a subtle smoky flavor, then proceed with the pan-searing process.
Using a Grill Pan: A grill pan can be used to achieve a char-grilled effect on the clams. Heat the grill pan over high heat, add the clams, and sear them, creating beautiful grill marks.
Infused Oils: Experiment with infused oils to add unique flavors to your clams. Infuse olive oil with herbs, spices, or even citrus zest. This will add another layer of complexity to the dish.
Sous Vide Clams: For a more precise cooking method, consider using a sous vide. Cook the clams in a water bath at a specific temperature for a set time, then sear them in a pan to create a crust. This method ensures perfectly cooked clams.
Broth Considerations: The broth created during pan-searing is incredibly flavorful. You can enhance it with different broths, such as fish stock or vegetable broth, for added depth of flavor.
Pairing with Wine: The right wine can enhance the flavors of pan-seared clams. Consider pairing them with a crisp white wine, such as Sauvignon Blanc, Pinot Grigio, or a dry Rosé. The acidity in the wine will cut through the richness of the dish.
Serving Suggestions: Pan-seared clams can be served in a variety of ways. Consider serving them as an appetizer with crusty bread for dipping, or as a main course with pasta, rice, or a fresh salad. Garnishing with fresh herbs and a squeeze of lemon juice adds a refreshing touch.
Sustainability: When purchasing clams, consider the sustainability of the source. Look for clams that are harvested responsibly and from sustainable fisheries. This ensures that you are enjoying your meal while also protecting the environment.
Pan-seared clams offer a world of culinary possibilities. With practice, experimentation, and a passion for flavor, you can master this delicious dish and create memorable dining experiences for yourself and your loved ones. Embrace the journey, enjoy the process, and let your creativity shine in the kitchen.