The key to perfectly clean scallops lies in understanding their nature and the factors that contribute to that characteristic ‘fishy’ smell. This smell is primarily due to trimethylamine oxide (TMAO), a compound that breaks down into trimethylamine (TMA) as the scallop ages or is improperly stored. Freshness is paramount, but even fresh scallops require proper handling to preserve their inherent sweetness.
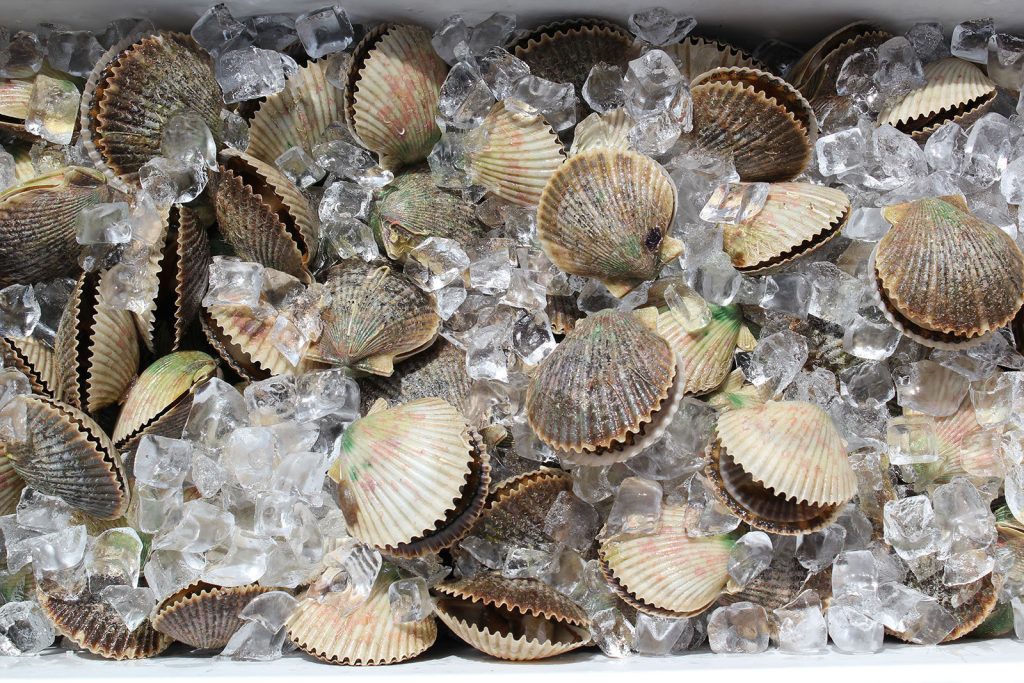
Before we even begin cleaning, the first crucial step is sourcing high-quality scallops. Opt for scallops that have a faint, pleasant smell of the sea, not an overpowering fishy or ammonia-like odor. If buying live scallops, ensure their shells are tightly closed or close when tapped. For shucked scallops, look for plump, moist, and slightly translucent flesh. Avoid those that appear dry, discolored, or have a milky liquid surrounding them.
When you bring your scallops home, proper storage is vital. If they are in their shells, keep them on ice in the refrigerator, ensuring good air circulation. If they are shucked, store them in a breathable container, again, on ice. It’s best to clean and prepare scallops as soon as possible after purchase to ensure maximum freshness.
The cleaning process can be divided into several stages, starting with the initial rinse. Regardless of whether your scallops are in the shell or shucked, a gentle rinse under cold running water is the first step. This helps to remove any superficial debris, sand, or grit that might be clinging to them.
For scallops still in their shells, this initial rinse is particularly important. Gently scrub the shells under cold water using a stiff brush. Pay attention to any nooks and crannies where sand or mud might be lodged. Discard any scallops with broken shells or those that remain open after tapping, as these are likely dead and not safe for consumption.
Once rinsed, you’ll need to shuck the scallops if they are still in their shells. This requires a bit of technique and a tool like a shucking knife or a sturdy, dull butter knife. Insert the knife into the small opening of the shell, twist to pry it open, and then carefully slide the knife along the inside of the top shell to detach the adductor muscle. Scoop out the scallop meat.
After shucking, you’ll notice a small, tough, side muscle attached to the scallop’s body. This is often referred to as the ‘foot’ or the ‘beard.’ While edible, it can be quite tough and chewy, detracting from the overall texture of the scallop. It’s essential to remove this side muscle for the best eating experience.
To remove the side muscle, gently grasp it between your thumb and forefinger and pull it away from the scallop’s body. It should detach easily. If it’s stubborn, a gentle tug or a slight twist might be necessary. Don’t worry if you can’t get every single bit; a small remnant is usually fine.
Now, let’s focus on the ‘fishy’ smell. One of the most effective methods to combat this is by soaking the scallops in a brine or a milk solution. Milk is particularly effective because its proteins can bind to the compounds responsible for the fishy odor, neutralizing them.
To prepare a milk soak, place your shucked and cleaned scallops in a bowl and cover them completely with cold milk. Let them soak in the refrigerator for about 20-30 minutes. Do not soak them for too long, as this can affect their texture and make them waterlogged.
Alternatively, a saltwater brine can also work wonders. Mix about 1/4 cup of salt with 4 cups of cold water. Submerge the scallops in this solution for about 15-20 minutes in the refrigerator. The salt helps to firm up the scallop and draw out impurities.
After the soaking period, it’s crucial to rinse the scallops thoroughly under cold running water. This removes any residual milk or salt solution, along with any impurities that have been drawn out. Pat them completely dry with paper towels. This step is non-negotiable for achieving a good sear.
Why is drying so important? Water is the enemy of a good sear. If your scallops are wet, they will steam rather than sear when they hit the hot pan. This results in a rubbery texture and a lack of that beautiful golden-brown crust that signifies perfectly cooked scallops.
Beyond the milk and brine soaks, some chefs advocate for a quick rinse in a diluted lemon juice or vinegar solution. This acidic rinse can help to cut through any lingering fishiness. A common ratio is 1 tablespoon of lemon juice or white vinegar to 1 cup of cold water. Rinse for just a minute or two, then rinse again with plain cold water and pat dry.
For those who are particularly sensitive to the smell or have scallops that are slightly past their prime (but still safe to eat), a combination of methods might be necessary. Start with a gentle rinse, then a milk soak, followed by a thorough rinse and dry.
Another factor that influences the perceived ‘fishiness’ is the presence of the orange coral (roe) attached to some scallops. While perfectly edible and flavorful, some people find its taste and texture to be too intense or ‘fishy.’ If you prefer a milder flavor, you can gently detach and discard the coral before cleaning the main muscle.
When preparing scallops, avoid overcooking them at all costs. Overcooked scallops become tough and rubbery, which can exacerbate any perceived off-flavors. Scallops cook very quickly, often in just 1-3 minutes per side, depending on their size.
The cooking method also plays a role. Pan-searing is a popular choice because it allows for a beautiful crust and a moist interior. Ensure your pan is hot, use a good quality fat like butter or oil, and don’t overcrowd the pan, as this will lower the temperature and lead to steaming.
If you’re making a sauce for your scallops, consider the ingredients. Strong, overpowering flavors can mask the delicate sweetness of the scallop. Aim for complementary flavors like garlic, white wine, lemon, or fresh herbs.
Proper handling extends to the tools you use. Ensure all knives, cutting boards, and bowls are thoroughly cleaned before and after use, especially if you’ve been handling other raw seafood or meats. This prevents cross-contamination and the transfer of unwanted odors.
For those buying pre-shucked scallops, the process is slightly simpler. You’ll still need to rinse them under cold water and, crucially, pat them completely dry. The milk or brine soak is still highly recommended to ensure optimal flavor and texture.
Consider the source of your scallops. If possible, purchase from reputable fishmongers who can provide information about the scallops’ origin and freshness. This proactive approach can save you a lot of cleaning and preparation headaches.
Freezing can sometimes affect the texture and perceived freshness of scallops. If you’ve frozen scallops, allow them to thaw slowly in the refrigerator. Once thawed, they may benefit even more from a milk soak and thorough drying before cooking.
Think about the type of scallops you are purchasing. Sea scallops are typically larger and have a milder flavor, making them more forgiving for beginners. Bay scallops are smaller and have a more intense, sweeter flavor, but they cook even faster and require precise handling.
Ultimately, the goal is to highlight the natural sweetness of the scallop. By following these cleaning and preparation tips, you’re not just removing an unpleasant odor; you’re unlocking the full potential of this exquisite seafood.
Remember that freshness is the foundation. Even the best cleaning techniques cannot salvage scallops that were not fresh to begin with. Always prioritize buying the freshest product possible.
The side muscle removal is often overlooked but is critical for texture. A tough, chewy muscle can ruin an otherwise perfectly cooked scallop.
The drying step before cooking is perhaps the most underestimated but vital for achieving that sought-after golden-brown sear.
Don’t be afraid to experiment with the soaking times, but always err on the side of caution – less time is often better than too much.
A clean and organized workspace not only ensures food safety but also makes the entire preparation process more efficient and enjoyable.
By investing a little extra time and care in the cleaning and preparation of your scallops, you ensure a delightful dining experience, showcasing the true, unadulterated flavor of the sea.
Enjoy your perfectly prepared, sweet, and odor-free scallops!
These techniques are applicable whether you’re cooking for a special occasion or simply enjoying a weeknight seafood treat.