For home cooks and culinary enthusiasts alike, the prospect of frying octopus can be intimidating. Octopus is a muscle-heavy cephalopod that toughens quickly when exposed to heat. However, with the right preparation methods and frying tips, you can transform this intimidating ingredient into a gourmet seafood delicacy. This guide will walk you through every step of the process, ensuring your result is nothing short of perfection.
1. Selecting the Right Octopus
The foundation of excellent Tako Fry lies in the quality of the raw ingredient. When visiting a fish market or grocery store, you will typically encounter two types of octopus: raw (greyish and slimy) and pre-boiled (bright red/purple and firm). For beginners, pre-boiled octopus is often recommended as it eliminates the arduous cleaning and initial cooking phases, allowing you to focus solely on the seasoning and frying.
If you choose to buy raw octopus to maximize freshness, look for specimens with clear eyes and skin that appears glossy and wet, not dull or dry. The smell should be like the ocean—fresh and saline—rather than fishy or ammonia-like. If buying pre-boiled octopus, ensure the flesh is firm to the touch and the color is vibrant. Avoid any cuts that look slimy or are sitting in a pool of milky liquid, as this indicates the product is past its prime.
2. The Essential Cleaning Process
If you are working with raw octopus, cleaning is the most critical step. Octopus skin is covered in a thick layer of slime that can impart a foul odor and prevent breading from adhering properly. To remove this, place the octopus in a large bowl and cover it generously with coarse salt. You must scrub the octopus vigorously by hand, massaging the salt into the tentacles.
Rinse the octopus under cold running water and repeat the salt scrub process two or three times until the surface feels squeaky clean rather than slippery. Some chefs also use a mixture of salt and flour or cornstarch during the scrubbing phase, as the starch helps absorb the slime more effectively than salt alone. This step also helps to remove any residual grit or sand from the suction cups.
3. Tenderizing Techniques
The biggest challenge with Tako Fry is texture. Octopus can easily become rubbery and impossible to chew. To prevent this, mechanical tenderizing is necessary. Before boiling or coating, use a wooden pestle or the back of a heavy knife to gently beat the tentacles. This breaks down the fibrous muscle tissues without destroying the shape of the meat.
Another traditional Japanese method involves massaging the octopus with grated daikon radish. The natural enzymes (diastase) found in the radish help break down the proteins in the octopus, resulting in a much softer texture. Simply massage the grated radish into the clean octopus and let it sit for about 30 minutes before rinsing.
4. The Pre-Boiling Strategy
Even if you intend to fry the octopus, pre-boiling is often required to ensure the meat is cooked through before the batter burns. Bring a large pot of water to a boil. To enhance the color and flavor, you can add soy sauce, tea leaves, or a splash of vinegar to the water. Dip the octopus tentacles into the boiling water three times before fully submerging them; this technique, known as ‘shocking,’ causes the tentacles to curl up aesthetically.
Boil the octopus for strictly 3 to 5 minutes depending on the size. Overboiling is the primary cause of rubbery octopus. Once the time is up, immediately transfer the octopus into an ice-water bath. This stops the cooking process instantly, locking in the texture and preventing the meat from tightening further.
5. Drying and Cutting
Moisture is the enemy of a crispy fry. After cooling, you must dry the octopus thoroughly with paper towels. Any water left on the surface will create steam during frying, which separates the breading from the meat, leading to a ‘naked’ fried octopus. Ensure the suction cups are dry, as water tends to get trapped inside them.
When cutting the octopus for frying, the angle matters. Use a technique called Sogi-giri (slant cutting). Hold your knife at a 45-degree angle and slice the tentacles into bite-sized pieces. Cutting against the grain and at an angle increases the surface area for the batter to cling to and shortens the muscle fibers, making each bite easier to chew.
6. Marination for Depth of Flavor
While octopus has a distinct flavor, it benefits greatly from a brief marinade. A classic mixture includes soy sauce, grated ginger, minced garlic, and a splash of sake or mirin. Toss the cut octopus pieces in this mixture and let them sit for 15 to 20 minutes. Do not marinate for too long, or the salt in the soy sauce will begin to draw out moisture, toughening the meat.
7. The Perfect Coating System
For a true ‘Tako Fry’ (as opposed to Karaage), you will want a breaded coating similar to Tonkatsu. Set up a standard breading station: one bowl with flour, one with beaten eggs, and one with Panko (Japanese breadcrumbs). Panko is essential here; unlike standard breadcrumbs, Panko is coarser and flakier, absorbing less oil and creating a lighter, crunchier crust.
First, dust the marinated octopus pieces in flour. Shake off the excess vigorously. You want a thin veil of flour, not a thick cake. If the flour layer is too thick, the egg wash won’t adhere to the meat, and the coating will slide off after frying. Next, dip into the egg wash, ensuring complete coverage.
Finally, press the octopus firmly into the Panko. Do not just roll it; press down with your palm to ensure the crumbs embed themselves into the egg layer. This pressure helps the coating stay intact during the violent bubbling of the deep-frying process.
8. Oil Temperature and Management
Use a neutral oil with a high smoke point, such as canola, vegetable, or rice bran oil. The optimal temperature for frying seafood is between 170°C and 180°C (340°F – 355°F). If the oil is too cool, the breadcrumbs will soak up grease, resulting in a heavy, oily dish. If it is too hot, the Panko will burn before the heat penetrates the octopus.
To test the temperature without a thermometer, drop a single piece of Panko into the oil. If it sinks to the middle and immediately rises to the surface with vigorous bubbling, the oil is ready. If it sinks to the bottom and stays there, the oil is too cold. If it stays on the surface and darkens instantly, the oil is too hot.
9. The Frying Process
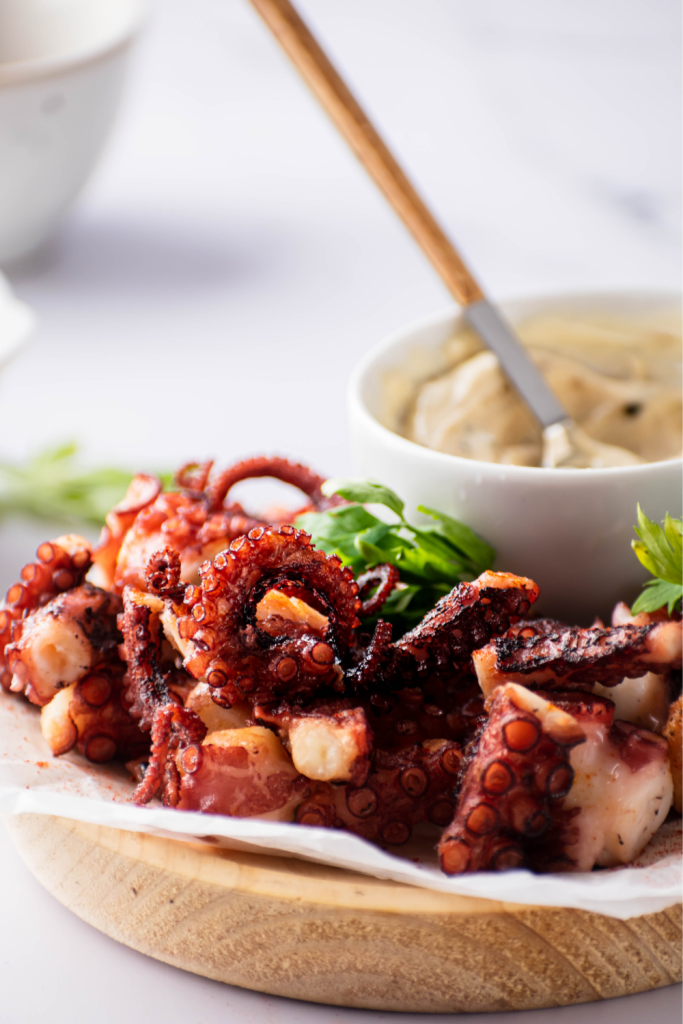
Fry the octopus in small batches. Overcrowding the pot drops the oil temperature drastically, leading to soggy food. Drop the pieces in one by one to prevent them from sticking together. Since the octopus is likely pre-boiled or cooks very quickly, the frying time is short—usually about 1 to 2 minutes, or until the Panko turns a rich golden brown.
Listen to the sound of the frying. Initially, the sound will be loud and low-pitched due to the moisture evaporating. As the octopus finishes frying, the bubbles will become smaller, and the sound will change to a higher-pitched crackle. This indicates that most of the surface moisture is gone, and the crust is crispy.
10. Draining and Resting
Once the Tako Fry is golden, remove the pieces using a wire skimmer or tongs. Do not place them directly onto a flat plate or paper towel immediately, as the steam releasing from the bottom will make the crust soggy. Instead, place them on a wire rack to drain excess oil and allow air to circulate around the entire piece.
11. Serving Suggestions
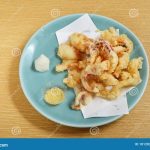
Tako Fry is best served piping hot. Traditional accompaniments include a wedge of lemon to cut through the richness of the fried batter. A side of Japanese mayonnaise sprinkled with Shichimi Togarashi (seven-spice blend) provides a creamy, spicy kick that complements the savory octopus perfectly.
Another excellent dipping option is distinctively Japanese Tartar Sauce, which often includes chopped boiled eggs, onions, pickles, and parsley mixed with mayonnaise. For a lighter touch, a simple dipping salt mixed with matcha powder (Matcha-jio) or curry powder can add a sophisticated twist to the dish.
12. Troubleshooting Common Issues
Problem: The batter falls off. This usually happens because the octopus was too wet before flouring, or the flour layer was too thick. Ensure the octopus is patted completely dry before the dredging process begins.
Problem: The octopus is tough. This is a sign of overcooking. Remember, if you pre-boiled the octopus, you are essentially just cooking the crust. Keep the frying time short and the oil hot. If using raw octopus, ensure you spent enough time tenderizing it during prep.
Problem: The coating is soggy. This indicates the oil temperature was too low. Always wait for the oil to return to the correct temperature between batches. Using a heavy pot, like a Dutch oven, helps maintain a steady oil temperature better than a thin aluminum pan.
13. Variations on Tako Fry
While breaded Tako Fry is delicious, you can also try Tako Karaage. In this version, skip the egg and Panko. Simply marinate the octopus and coat it in potato starch (Katakuriko) or cornstarch before frying. This results in a thinner, lighter, and gluten-free crunch that is equally addictive.
You can also infuse flavor directly into the breading. Mixing dried herbs, parmesan cheese, or garlic powder into the Panko crumbs before frying adds an extra layer of complexity to the dish, making it suitable for Western-style appetizers as well as Japanese meals.
Conclusion
Making restaurant-quality Tako Fry at home is an achievable feat that rewards patience and attention to detail. By selecting fresh ingredients, dedicating time to proper cleaning and tenderizing, and managing your frying temperature, you can create a dish that is texturally exciting and deeply flavorful. Whether served as a savory snack with drinks or as a main course with rice and miso soup, homemade Tako Fry is sure to impress your family and guests.